Macaws:
Red Shouldered (Hahn's) Macaw
Severe Macaw
Blue And Gold Macaw
Blue Throated Macaw
Military Macaw
Red Fronted Macaw
Scarlet Macaw
Green Winged Macaw
Hyacinth Macaw
During the 2nd and 3rd flight training sessions, little progress has been made. Of course the additional flight recalls and environmental experience were valuable.
On the second day, there happened to be a basketball game going on in the gym above. Every bounce of the ball along with endless stomping was heard. The birds did not do well during this, however, they did get partially desensitized and they did very well once the noises ended.
Truman had a few successful flights down from the beams but then again he was going up there an awful lot as well. Also, on one of his reckless flights he hit the mirror. He did not hit it all that hard and bounced off. He was more surprised about what happened than hurt. That was the first and last time he hit a mirror during these training sessions. Kili had the same thing happen to her during the first flight session.
Not every session will bring new progress. However, if you don't keep trying, you won't know which sessions are going to be the breakthroughs.
I have begun advanced flight training with my parrots Kili and Truman to prepare for some upcoming performances we are giving. They are generally good birds and I don't expect them to fly off their stands on stage, however, if something frightens them or they slip, they wouldn't know what to do. So the best way to make it safe to have them in a large open space is to flight train them in one so they would know what to do. In coming weeks I am going to share with you the details of our indoor flight training so that it may help you with your parrot whether you're flying it in a large building or at home.
I made an arrangement with the high school I used to go to - and which my brother currently attends - to come twice a week to fly the parrots after hours. In return I am going to give a performance in front of the students in March. Not only is this a good justification for all the training practice, but the performance itself will be a test of their capabilities in preparation for the big show coming up (can't tell you about it yet so don't even ask).
On the first day of training, my brother and I brought Kili and Truman to the school after it had already turned dark and the bustling classrooms and hallways had long been vacated. Though the night was cold, there was little more comfort from the cold that we could provide the parrots beyond a towel covering their carriers. We brought two carriers, two training perches, a box full of toys and treats, and a roll of paper towels. We set up in the wrestling room, essentially a small gym about 60ft x 30ft x 18ft. The space was not that much larger than my apartment which the parrots are accustomed to flying around at will. However, there were two notable differences aside from the novelty of the room. The ceiling was significantly higher and one wall was entirely lined with mirrors making the room appear twice as big.
I let the parrots sit on their Training Perches for a few minutes just to become accustomed to the new room but soon proceeded to cue tricks from Kili and Truman to get them focused on training. If they refuse to do tricks, then there is little hope for flight recall. However, Kili was performing tricks quite eagerly so flight recalls were in order. I started with shorter recalls and after just a few calls, she did fly to me willingly from her perch. Truman on the other hand did not want to budge and was pretty much stunned by the novelty of the room.
I continued expanding my recalls with Kili until I was able to recall her from the far end of the room. She adapted quickly to the mirrors and did not fly toward them. Truman on the other hand would refuse to do anything besides staying still and staring. In order to break the trend, I began doing forced return to perch flights with Truman. However, I gave him treats every time he went to the perch. This way he at least did some flapping in the room, learned that flying there is safe, and had a way to earn treats. Furthermore it was teaching him that if he needs a place to go, the Training Perch is the best place to return to.
However, things did not run so smoothly with Truman. On one slightly longer return flight to his perch, Truman took off. He flew laps around the room getting faster and higher. He was not showing any inclination of flying back down to me. After a few exhausting laps he landed on a high beam and stayed there for a while. There was no use calling him down because he just wouldn't do it. He did make a few attempts to fly but they would just result in doing a lap and coming back to where he started off. Although I knew he knew how to fly down, it appeared as though Truman did not know how to descend. At home, I've seen him fly down 10ft lots of times, but here the ceiling was higher and the angle required to descend was much steeper.
After a while of not being able to get him to fly back to me, I resorted to plan B. I held Truman's Training Perch as high as I could first trying to get him to fly to it but then just to step up. As I approached him with his Training Perch, he finally took a leap and flew a few feet to land on it. I slowly brought him down and rewarded him generously for allowing for his recovery. It wasn't because Truman did not want to be with me but because he was unaware of how to return.
It didn't seem that I could motivate Truman to fly to me for bits of food, so I broke out the toys and tried to get him to fly for those. It still was not working so I let Kili show him the way by flying to me for a chance to bite off a piece of wood. Finally Truman began doing recalls to me. He did several recalls of increasing length and although they weren't instantaneous, they were finally leading to him flying on his own.
Toward the end I got out almonds to give to the parrots for some good recalls. Kili was stuffed from all the nuts she earned before and did not recall for it. Truman on the other hand did - his longest recall for the day. However, instead of landing on his perch when I sent him back, he ended up flying onto the high beam again. Luckily he dropped his nut on the way up. Otherwise he would have sat up there enjoying his nut and feeling reinforced for going there. Then there wouldn't be any hope of him coming down. I picked up the nut he dropped and walked to the far end of the room with it. He had a keen eye on that nut and the moment I recalled him, he flew right down to me. This was a highly valuable lesson learned for Truman that day was that coming down to me is a very good thing. I let the parrots relax on their perches and play with toys for the remaining bit of time I had prior to packing up and taking them home. And so concluded my first advanced flight training session with Kili & Truman in an unfamiliar place.
Flight is an integral part of the parrot's "birdedness" but also one of the fun aspects of keeping them as a companion. I would like to share with you some of the cool flighted things my parrots do:
Last but not least, when a parrot gets too annoying being on me, I can chuck it toward its cage and it will fly back and hang out there for a while. While there are some new precautions we need to take when dealing with flighted parrots, there are also new perks involved. With a flighted parrot it becomes possible to spend a lazy evening without leaving the couch and have your parrot come to you and go at will. I can sit at my tv/computer (my TV is my computer... the computer has a 42" TV hooked up to it with wireless keyboard and mouse so I browse the net from my couch) and browse my parrot forum or watch a movie and call a parrot over to play with and then send it off to do its own thing when I'm done. The parrots can also notify they want my attention by flying over or more typically looking anxious to fly and letting me call them.
Come on, most other pets do not come with the incredible features that parrots include by default such as dazzling colors, vocalization capability, and flight. It is a major shame when owners cannot appreciate their birds for everything that they are capable of. Flight should not be considered a hindrance to your relationship but rather a bonus. I miss none of the benefits a clipped parrot owner may claim but also get to enjoy the flighted fun. My parrots are no less likely to step up, accept handling, and desire to be with me than if they were clipped. The secret to success is good taming techniques, patience, routine, and consistency and not clipping.
I can spend just as much time complaining about how much flighted parrots can be a pain in the butt, however, this article is meant to outline the positive aspects. Most of the undesirable ones really are just related to how parrots are rather than a fault of being flighted. So I made this video just to share some of the thrill of keeping parrots flighted in hopes of encouraging others to get to experience this for themselves. This is also meant to serve as a flight training progress update for Truman as I realized that I haven't shared his latest capabilities although they have greatly improved since last shown. Truman can recall to me anywhere and is very maneuverable. The following video shows how he recalls to me when completely out of sight around two corners. He follows the sound of my voice from his cage and finds me wherever I am. Kili can do this to some extent as well, but she is nowhere near as maneuverable as Truman. I also realized that I haven't really shared how I put my parrots away in their cages so I share that as well. Lately I've been able to recall them simultaneously when it is time to go back to cages and they both fly and land on each of my hands. Unfortunately in the video Truman hesitated a little. I just couldn't capture a shot where they fly at the same time, but when it happens it is truly beautiful. Flight is beautiful.
Alternatively the title could be: Cages By Design, The Most Flawed Product I Have Ever Bought In My Life. I do realize that this article is very very long and so is the video. However, so much has happened and there was no way I could have shared the idiocy of what happened in anything shorter. I never planned for there to be so many problems or to hold back on publishing this article for so long. It just happened to be that this was the worst cage I have ever come across and the details of this article will sound like a riot! Really, if it weren't so frustrating it would just be funny.
This is a must read for anyone thinking of buying anything from the company Cages By Design, contemplating an outdoor aviary, has an outdoor aviary and might like to pick up a few suggestions, or is just in the mood to read the most outrageous product review of all time. I think once you get started, you won't be able to stop. Thanks for reading. Here is my misery for your reading entertainment...
Deciding to Get An Aviary
Back in July, while having lunch with my mother, we talked about how great it would be for my parrots to spend more time outside. She suggested putting them outside in my backyard in a cage so they could get some sunlight and fresh air. I immediately knew that putting them outside in a regular cage was not an option but this got me thinking. I started researching ideas about building or buying an aviary to put in the backyard. I had not previously considered this because I used to have just one parrot and didn't particularly think the backyard suitable. However, now with two birds the concept has become much more appealing.
At first, I was looking into options of building a wire mesh enclosure myself. The main things that were discouraging me were that I would have to deal with zinc covered steel mesh (zinc is toxic to parrots) and that it would end up looking really bad. I looked into the cost of materials and decided that building an aviary vs. buying one was not that drastically different in price and that a manufactured one would not only be a major price saving but also hold up better in the long run. There are very few aviaries available on the market so my selection was quite limited. I do not have a lot of space available so I wanted to find the largest aviary that would conveniently fit my area. Having seen advertisements and heard things about Suncatcher aviaries made by Cages By Design in the past, I was keeping them in top consideration as I searched for an aviary manufacturer. I was in a hurry to order one as soon as possible so that I could get the birds into it before the summer ends. I decided that getting Truman used to being in an outdoor aviary while he is still young would be best and prepare him for spending lots of summers outdoors.
Initially I was looking at their smallest aviaries but decided that in the long run it's better to go all out and buy the largest one that I can fit up front. I only had Truman for a very brief time at the point that I was deciding to get an aviary. It was right around the time (or possibly just before) I introduced Kili to Truman so I was really uncertain if the two parrots could share an aviary space together. I really had no idea how they would ultimately get along so I wanted to play it safe. I found an 8'x5' walk in aviary with a divider. Essentially it is the same as a regular version but it provides a panel to divide the aviary into two and has an additional door for retrieving the second bird out of the other side. It would be very costly/difficult to add the divider to the regular aviary later so I decided to shell out up front to buy the one with the divider and extra door included.
I was almost ready to confirm my order when I discovered a different website that was offering the exact same cage for $110 less than CagesByDesign. The other site was merely a reseller and would most likely defer the order directly to the manufacturer anyway. I pointed this out and offered to still order directly as long as they would match the other retailers price. There was practically no way they could turn this down because if I went to the other retailer, Cages By Design would still end up manufacturing the cage but would then be paying a commission or a certain cut to that retailer anyway. After a bit of back and forth they did agree to match the price.
Additional Considerations
Since ordering, I came to realize that Kili and Truman get along well enough and that I probably won't need to actually divide it. I began training them together and encouraging them to play closer and closer together. I began having doubts if the divider would really be necessary. The other add on option that I ordered was the friendly feeder system. I decided to just have the feeders put in initially (so the holes in the wire could be made at the factory) and then decide later if I want to use them or not. I figured worst case, I could just have them installed and leave them closed and not use them.
A few weeks since ordering, I was considering various security precautions involved with having my parrots outdoors. When I mention security precautions, I am as much talking about escape as theft. I live in a very dense urban environment and an intruder entering the yard is not impossible. In order to be able to use the aviary effectively, I would need to be able to leave the parrots there unattended. There would be no point for me to use the aviary attended only because then I may as well just take my parrots outside on a harness. The purpose of having an aviary is to be able to leave them in there for multiple hours unattended in the day time so they could have more space to fly and play than in their cages at home as well as getting some sun and air. Additional security concerns include other animals getting into the aviary and some sort of natural elements tipping the aviary over.
I decided to bury a wire mesh underneath the gravel in the yard and connect it to the cage both to serve as a foundation and to thwart burrowing rodents from getting in. To reduce the likelihood of someone trying to steal or "liberate" the parrots, I bought heavy padlocks to use on the doors. I considered security concerns from different angles and came up with solutions. The only major concern that remained was the friendly feeders. I called the company to find out how the feeders are connected and it turned out that they are merely screwed in with a few screws. If I am padlocking the door latch, it is pretty silly to have a feeder installed that is merely held on by a few screws. I asked if they could rivet the feeders in or come up with a more secure method but they could not. I was worried that it was too late to cancel the feeders but they told me that my cage was still in production and that they would cancel the feeders for me.
A few more weeks passed and Truman had sustained a leg injury. I was disappointed that he would not get to go in the aviary when it would arrive. I resolved not to put Kili in the aviary before Truman as she can get very territorial. I wanted to introduce them to the aviary simultaneously or Truman first so that he could be more comfortable in it. I did not have any warning of the day the aviary would arrive and was starting to worry the company wasn't sending it out. Finally on August 10th the aviary arrived. It took longer than the 2 weeks the company suggested it would take but still within their 4 week guarantee. I got a call at 9:50AM the day of delivery that the truck was coming. It turned out he was a just a few blocks away and I had to rush out to meet him. I also had to scramble to get my father and brother to come over to help carry all the parts in.
Accepting the Shipment
The truck arrived and I was prepared to collect the parts for the aviary. Lift gate service would have cost an additional $125 at the time of my order so I opted to retrieve the panels from the truck myself. It turned out that the truck did have a liftgate but the driver did not use it. Instead he passed the panels to me one at a time. His help was appreciated. I did not see any instructions or hardware amongst what we had removed so I had to climb into the truck and check amidst the packaging to see if anything was left behind. Sure enough the instructions and pack of bolts got buried in the packaging materials. I could not find anything else but was concerned that the package the aviary came in was already opened before arrival and there were parts scattered around the truck. I was also disappointed to find the friendly feeders and the holes cut out in the panels considering they told me it was no problem to cancel them several weeks back. Furthermore they had charged me fedex shipping for the feeders (because they could get damaged in cargo shipping with the aviary) and yet they came on the pallet with the aviary.
Beginning Assembly - The Problems Begin
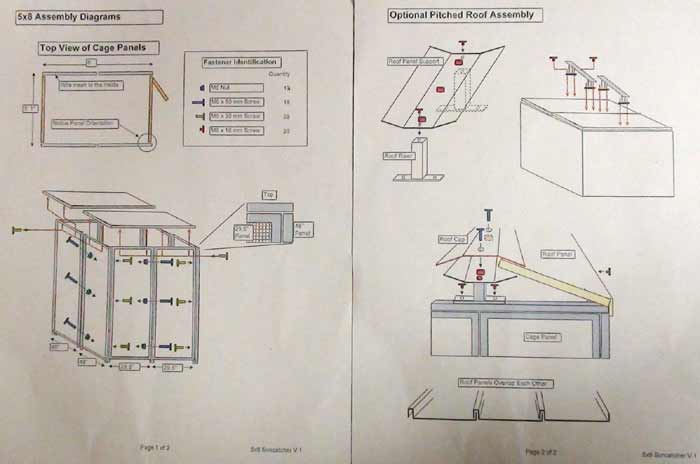
Between the three of us, we lugged the aviary piece by piece through the building and into the backyard in no time. My brother and I continued preparations and assembly on our own beyond this point. The next thing to do was to move all of the gravel in the yard off the space where the aviary would go. It was my intention from the start to place the aviary below gravel level and then bury it into the yard. I wanted to move the gravel aside a day in advance but I did not have enough notice about the delivery to prepare in advance. It took a few hours to clean up the yard, pull any weeds, and move the gravel aside. Finally the space was prepared and I was hoping to complete the assembly of the aviary the same day. I tried to study the instructions but they were a mere two pages with nothing more than some primitive diagrams. I decided that I'll just refer to them and figure it out as I go.
Inaccurate and pretty unhelpful instructions for Suncatcher Aviary
We prepared to start assembling the aviary by bringing two panels together to form a corner. I attempted to bolt them together but the holes didn't line up. So I realized that one of the panels were upside down. We flipped it over and tried again. Still the holes wouldn't line up. We tried swapping with other panels and all sorts of methods to figure out how they could possibly come together. After half an hour of being stumped by this dilemma we concluded that it must be a manufacturer defect because there was absolutely no way that those panels could be joined with the holes so misplaced. Thus I called the manufacturer to bring this up and offered to send them digital photos demonstrating the discrepancy. I also voiced a displeasure with the fact that they had agreed to cancel the feeders but cut the holes for them anyway.
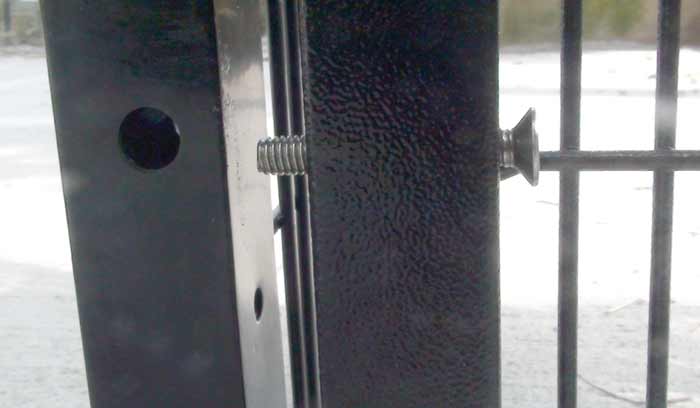
After reviewing the photos the manufacturer agreed that the holes were in fact misplaced. They offered me either to ship the defective panels back and wait a really long time for a new set or to accept a $250 refund to make up for the feeders and redrill my own holes. At this point I preferred the drill my own holes option. I had already waited so long for the aviary and any more wait would mean the birds would not get to go outside this season. Furthermore I did not look forward to loading everything back up on a truck, cleaning up, and then going through the same all over again. At this point it appeared that 8 holes would need to be drilled in a different spot. Luckily I have the tools and capabilities to do this but for someone just expecting to snap this thing together it would not be possible.
You can see the hole the bolt is meant to go into is actually too low
I checked the diameter of the bolts and picked a suitable drill bit. Then I measured where the holes needed to be in order to line up and marked the spot on the panel. I used an awl to prepare a pilot hole and then measured again to verify that the hole was accurately placed. Clearly someone did not hear of measure twice, cut once. Finally I used a power drill to make the suitable hole. I drilled the holes in just one panel to make sure it works before drilling any more panels. The holes lined up perfectly and it was very easy to get the bolts through. The allen key supplied with the kit is a joke. Instead I used my own ratchet wrench with metric allen key tip to have suitable leverage and back/forth motion to screw the bolts in.
More Problems
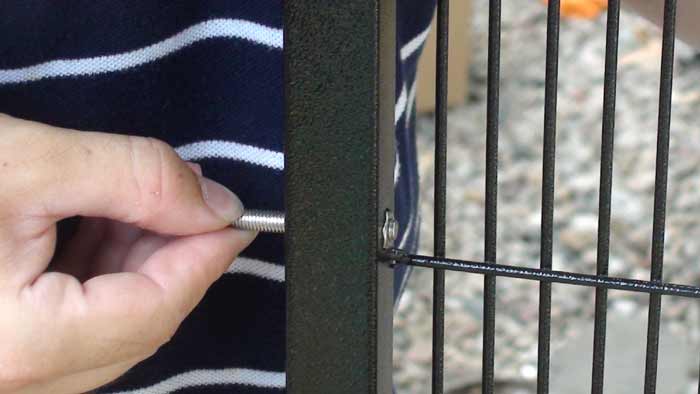
Then I discovered yet another problem with the aviary design. Some of the holes were too large and the bolt heads were falling into them. This clearly defeats the purpose of bolting things together. The solution was very simple, just a matter of adding washers to all of the bolts. There was really no reason for the manufacturer to be so skimpy and not include washers. However, for me it was not the expense but rather the extra trip to the hardware store that was a burden. I used washers for all of the bolts regardless if the holes were over drilled or not because they help make the connection more secure. Another specific tool required to assemble this aviary is a metric wrench for the nuts that secure some of the bolts. Once again without a washer they fall right in but the same washers that solved the bolt head situation, I used to keep the nuts from falling into the holes. While a metric allen key is included for the bolts, it is up to the buyer to find a suitable metric wrench.
All of the nuts fall in without washers and many of the bolt heads as well
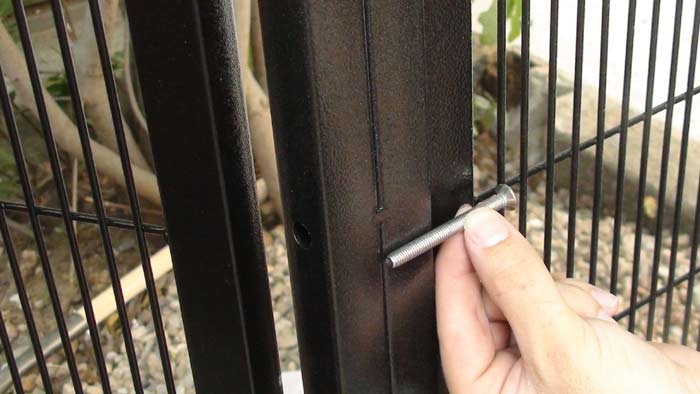
We continued drilling holes one panel at a time and adding them to the assembly. While it may have been easier to do all the drilling at once, I just wanted to be sure that each panel would custom fit. Also I was worried in case there might be any other discrepancies where the holes belong so I remeasured the whole positions specifically for each set of connections. We started getting good at this and were moving along at a reasonable pace until we hit yet another bump. By the time we were ready to mount the door we realized yet another major manufacturing mistake. The door panel has a double vertical tube construction as opposed to the single tube used on the regular panels. This strengthens the frame and creates a place for mounting the door hinges. Unfortunately the manufacturer overlooked the fact that it requires a 1/3 longer bolt to go through three sections of tubing rather than two. Not only were the longer bolts not included, they were not even accounted for in the laughable page of instructions. I wouldn't be surprised if they had never even put one of these together or it would have been so obvious that there are major issues with the kit. While conceivably the mis-drilled holes could have been a defect only specific to my order, it seems that the lack of washers or required longer bolt is standard across production as the instructions do not specify these as components in the package.
The longest supplied bolt was still too short to join 3 tubes at the door frame
So yet again I had to make a trip to the hardware store and I was lucky to just make it before closing time. I requested a bolt of the same metric thread but 1/3 longer in length. Unfortunately metric bolts are difficult to come by around here and limited in selection. So the proper bolt was unavailable. We decided to go with an imperial bolt of similar diameter instead. Since the holes were over drilled, the imperial bolts fit through and I was able to lock them in with a nut. The trouble was that imperial bolts of that length were only available with a protruding hex head. This head extended into the gap between the frame and door and was making it difficult to shut the door. By over tightening the bolt and allowing it to bend the tubing in a little bit, the problem was solved. The panels were secure and the door could open and close freely.
When we bought the long imperial bolts, we bought extras to account for the second door. However, because of the way the second door panel mounts in reverse, the longer bolts are actually unnecessary. But contrary to the bolt suggested by the instructions (the medium bolt of the set), the longest bolt in the set is necessary to make this attachment. Luckily two longer bolts remained from the other side which were replaced by the even longer imperial bolts so they solved this issue with available hardware. Then we came across another set back. This one had to do with our ground configuration rather than cage assembly.
My brother bolting a corner together with our own ratchet allen key
Ground Troubles
We had assembled all the aviary sides so it was beginning to take shape. While we didn't expect the aviary to stand perfectly on uneven ground, we had a problem because one side was barely touching the ground entirely. One of the trees in the yard had a shallow root that was forcing the cage to stand out of balance. This would either require elevating all other sides or breaking the root a bit. Since the goal was to bury the aviary in the first place, raising it was the least preferred option. So we looked for ways to break a notch into the root to get the aviary to stand a little lower and more even. Digging, chiseling, and sawing proved ineffective. The tedious solution that ended up proving helpful was to drill a plethora of wide holes in a series using a spade bit. The tree has many roots and I'm sure this one will heal itself around the cuts anyway. The root was very hard and the process took a long time. Finally we had a 2" wide by 10" across groove to drop the aviary side into and thereby bring the entire aviary closer to level and supported. The drilling had taken longer than expected and we were completing it in darkness.
Let's Not Be Too Optimistic
The following day we continued the project, starting out with mounting the top panels. I was excited that at first these did not seem defective as the first few holes that I tested lined right up. No sooner was I excited that finally something was not screwed up than it turned out that other holes in the same panel were in the wrong places. I had to unbolt the panel and take it down to drill holes. The defects were not symmetrical which made this all the more confusing. I had to verify each hole individual prior to redrilling them. The other top panel had the same problems. Once again this ended up turning into an all day affair because of new problems left to tackle.
Major Parts Missing
After mounting the top cage bars, we were ready to proceed to configuring the roof. I had previously seen that all the roof panels were packaged together and gave it little thought. Since there are so many components and much complexity, I was trying to work on the aviary in a linear fashion and tackle problems as they come. If I had known there would be so many problems, certainly I would have preferred to check everything up front but from a practical stand point that would have been very difficult because of limited space. So as we unpackaged the roof panels, we discovered that the roof risers, supports, and caps were entirely missing. I tried to call the manufacturer about this but it was already late in the day and they had closed. So the only thing to do at this point was to put this off and continue working on the bottom.
Preparing the Aviary Bottom
We unrolled the wire mesh I bought to line the bottom. Although it is galvanized, I am not worried about the parrots getting zinc poisoning as the mesh would be buried under several inches of gravel. We briefly lifted the aviary and pushed the mesh underneath. This way the aviary actually stands on top of the edge of the mesh and a few inches protrude outward. It took two pieces to cover the entire width of the cage but the overlap is not a problem at all. To create a bonding strength of a whole mesh underneath the aviary, we zip tied the two pieces of mesh together. Then we zip tied the ends of the mesh around the entire perimeter of the aviary spaced every few inches. We also added a dozen stakes into the mesh at the corners and various points around the aviary. So the aviary is securely tied to the mesh and the mesh is staked down to the ground. If that isn't enough to hold the aviary from tipping over, then the hundred of pounds of gravel we replaced back into the aviary surely will.
An insightful move on my part was to buy 6 bags of additional gravel and a huge bucket that was on sale. I wanted to make the gravel higher inside the aviary than out to help water flow outward and away from the aviary. Also the extra thickness keeping the birds away from the mesh was a good bonus along with the added weight. The bags of gravel made it easier to carry them straight into the aviary. They were a different colored rock than the ones existing in the yard so we buried these deeper so that they would only contribute to depth rather than surface. Then we used the large bucket to carry loads of gravel back into the aviary. This was much easier than carrying it one shovel load at a time. It was easy to rake and shovel the area clear before the aviary but carrying it through the door was solved by the bags and bucket solution.
Payback
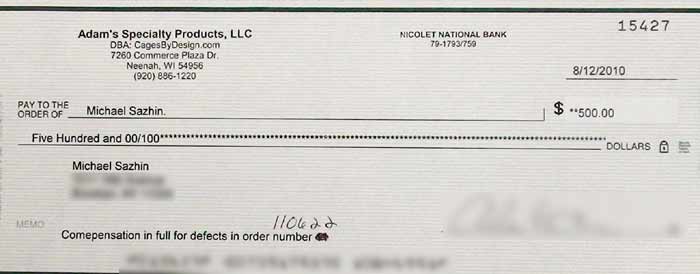
The following day I got a hold of the manufacturer and explained yet another problem (missing roof hardware and missing feeder hardware). After discussing with the manager and owner, they agreed to overnight all missing hardware to me as well as a $500 refund for defects. The hardware did not arrive the next day but rather the following one. We attached the roof risers and supports and then I prepared to start mounting roof panels. Yet again it turned out that supplied hardware was inadequate. I was 8 bolts short of being able to attach the 8 roof panels (one each). If the bolts were a normal thread, I would have just gotten them at the hardware store but these metric threads are really impossible to source. So there was yet another call to the manufacturer and some more waiting to do. 5 more days passed until I received the required bolts.
$500 refund check: "Compensation in full for defects"
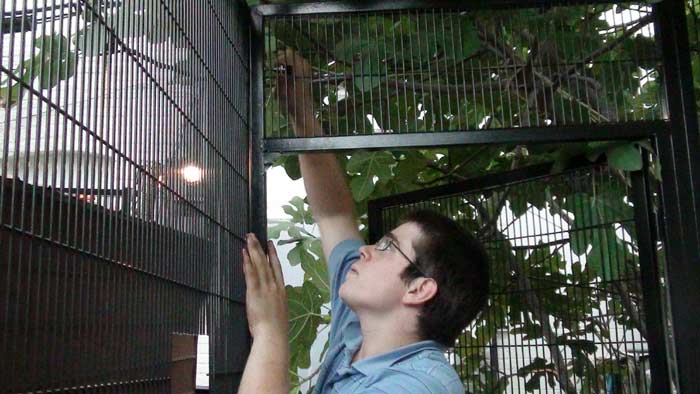
Finally Raising The Roof
Mounting the roof panels was fairly easy but then it took hours to get the caps onto them. The bolts for mounting those are just barely long enough but when you have to bolt in a bolt in the deepest part of the cage from the very top strictly by feel, a bit of extra length would have made it all the more possible. The roof is very thin and flimsy so standing on it is out of the question. I had to stand on the top most step of the ladder and hang over the aviary to try to get the bolts nearest the center into the blind hole. This was extremely difficult and probably one of the most dangerous parts of assembling the aviary. It also requires pressing down hard on the roof panels to get them low enough to get the barely reaching bolt in and then a lot of pressure is required on the wrench to get the bolt to thread inward. A longer bolt would have been a very relieving solution, but hey I don't think they have ever put one of these together on location so what would they know?
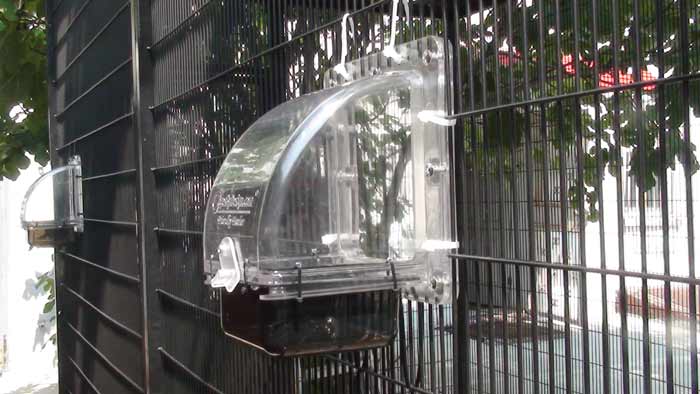
Not So Friendly Feeders
Next we made some alterations to the so called "friendly feeders" to make them a bit less friendly and instead more secure. Basically we used a drill press to put a lot of holes into it to zip tie things permanently shut. Originally I wanted to rivet the feeders into the aviary but I was worried about shattering the plastic. So instead we drilled holes and used a ton of zip ties in addition to the bolts that were sent to me in one of the follow up packages. As for the food bowl, I was absolutely not going to chance losing my birds to the security of a little flap on a flimsy screw holding the bowl from falling out. Considering my escape artist parrot had managed to get out of her cage when it wasn't double latched, I'm not going to take a remote chance of that outside. Once again it is also a theft concern as well because someone could remove the food bowl and reach an arm in through the feeder.
We added many zip ties to make the friendly feeders more secure
Since I was prepared to cancel the feeders all together, I was not concerned about the loss of convenience by locking the food bowls in permanently. We just added holes on all sides of the food bowls and zip tied them into the feeders. Not only does this prevent them from being able to slide, but it also eliminated the undesirable gap between the food bowl and the feeder. I do realize that my parrots could chew through the zip ties but I figure that quantity is on my side. I am likely to be able to catch that some are getting broken and replace them or come up with tougher solutions if it really becomes a problem. Recently I found a stainless steel equivalent to zip ties so I'm holding onto those in case I need such an upgrade. As for intrusion, I believe the same ideas apply. All of the reinforcements that I added increase the difficulty of a break in and thus make it less lucrative than a snatch and run. I seriously don't think that even with proper tools that it would be possible to break into that in cage in anything less than 10 minutes. Considering how much effort it took to build that aviary, I am certain it would take no less to take it apart. Cutting wire ties, unscrewing bolts, cutting the cage bars are all possibilities. However, these are all so numerous that it would require some heavy tooling and a big loud job to make it happen. Everything is protected multiple times. This is the best deterrent that is working on my side. I also plan to hang a security camera from a vantage point facing that way so I could keep an eye on the birds when I am not outside.
Completion
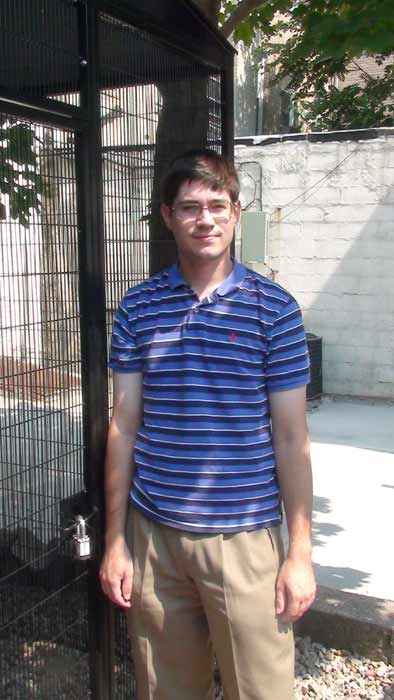
Finally by the 10th day the aviary was complete.
Standing by completed aviary content to finally be finished
Here is an approximate break up of the the time consumed on this project:
-Unloading truck and moving all parts to the site: 30 minutes -Preparing the space for the aviary: 4 hours -Redrilling defective holes: 3.5 hours -Assembling cage and roof: 6 hours -Adding security measures including bottom mesh, stakes, wire ties: 3 hours -Calls/emails to manufacturer about problems: 2 hours -Making additional trips to the hardware store: 1.5 hours -Waiting twice for missing parts to arrive: 8 days
Assembly Video
Cages By Design Product Review
So here is my overall review of the 8'x5' Suncatcher Aviary made by Cages By Design:
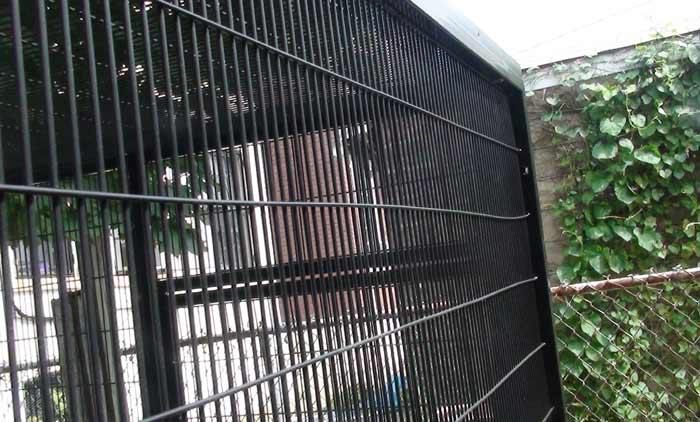
Except for the inaccurately helpless instructions, incorrect hole alignments, useless allen key, bolts falling through, unsupplied long bolts, dangerously insecure friendly feeders, missing feeder bolts, missing roof supports, missing roof bolts, poorly thought through assembly, frequently chipped powder coat, often weak or broken welds, inaccurate and poor workmanship, long turn around time, and exorbitantly high price... excellent!
You can see how the cage bars are wavy. It's difficult to show the broken welds.
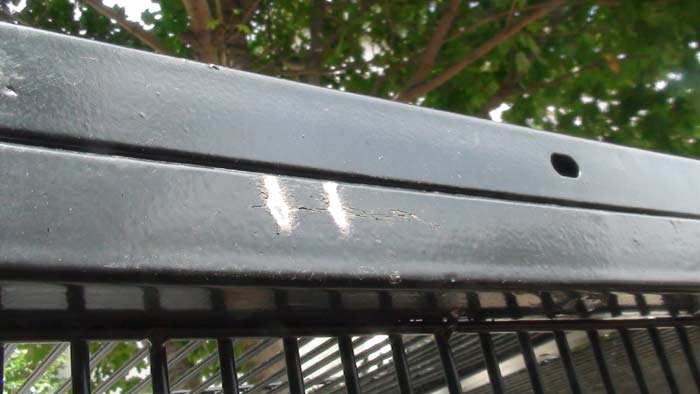
Just one of many examples of chipped powder coating. Honestly not sure if factory defect or caused in shipping
Basically if you are not a handyman or planning on hiring one, you can forget about ordering this product (or probably any product at all from this company, I can only imagine how these quality control standards carry over to other cages). On the other hand if you are good enough to tackle this kind of project, then you can probably build one of these on your own from scratch in about the same amount of time. The simple truth is that I had absolutely no idea that this would turn out to be such a nightmare. Once I got started, I was just drawn into fixing endless problems with this aviary. For the kind of money they charge for this product (and even taking the $500 refund into consideration), this is an absolute rip off. You would expect a high quality, professionally designed product that assembles easily for this kind of money but instead you get stuck with a tedious repair project.
I am convinced that the difficulties I had assembling this aviary are not an isolated incident but a complete design flaw. Online, I was surprised to read that other people had the exact same problems building this aviary. I also happened to meet some people who own this kind of aviary and they confirmed having much the same problems. For these reasons, I am quite certain that Cages By Design produces flawed products that are insanely overpriced. If they put have as much effort into design and quality control as they do marketing, they would have a more usable product.
Believe me, I was not predetermined to write a bad review. I was very excited to be getting an aviary for my parrots and would have been thrilled with the product if it just went together and my parrots could enjoy it. If there were only a single issue (say just feeder hardware missing), I could forgive that as an honest mistake. But when practically every component of assembly was laden with major flaws and things were missing, it is impossible to feel anything but cheated. Actually I (wrongly) assumed that for that kind of price everything would be perfect and that I would be able to make a video and go on to write a review about how fantastic the aviary is. I was actually hoping to be able to write a good review of the product and then strike up an advertising deal with the company. Their ads have already been flashing on my blog through google, so I wanted to approach them directly. However, now with the knowledge of how flaws their products are, I could not in my right mind ever recommend them to anyone. In fact I will be making sure that even through the automated google ads, that their advertisements never appear on my website. I would feel terrible if someone had to go through what I had been through as the result of seeing their marketing on my website. I would not go so far as calling their operation a scam as they did work with me and send me required parts and a partial refund. However, I can definitely say that they do as poor a job as you can imagine but at premium prices.
Originally, I wanted to be able to promote outdoor aviaries for parrots by demonstrating how easily I build mine and then how much they enjoy it. Unfortunately I did not find this economical or easy at all. Furthermore in my search for a suitable aviary, I did not come across much competition. So I am disappointed that at this time there is not a single commercially built aviary that I can recommend to my readers. Perhaps some day when a quality aviary appears on the market, I will be able to suggest it to you but until that day, I am forced to say that outdoor aviaries will only be limited to parrot owners with extensive building abilities and budgets.
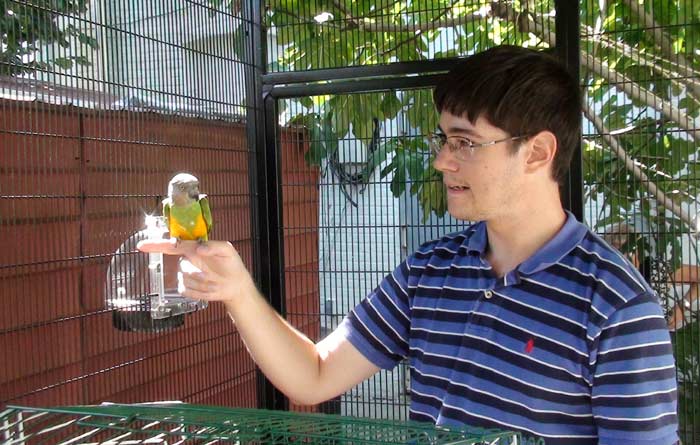
Kili and Truman's First Time in Aviary
Finally I would like to share with you the first time I showed the parrots the aviary. I had discussed with the vet office manager about taking Truman outside and she agreed that sunlight and fresh air would be good for him. Originally I was contemplating putting his entire tub into the aviary but she was suggesting going with a small cage of some sort. This struck an idea with me that I still had Duke's cage sitting around. If only Truman would fit through the door, I'd be able to leave him in the cage inside the aviary. There is no way I would leave him outside strictly in that flimsy wire cage, but inside the greater aviary this was perfectly safe. The purpose of the small cage served more to keep Truman from flying around the aviary or falling down.
Truman easily fit through the door and had plenty of room to spare. Turns out that's a fairly large cage after all. I did not put any perches in because I think it's best for Truman to stay on the flat bottom. Unfortunately, moments after I had put him in he began climbing the cage bars. Most of all I was worried about him falling and injuring his leg again. I put him back down and then added clips to each door on the cage to reduce the likelihood of him getting out. I grabbed Kili firmly and took them both out to the aviary in the backyard.
Kili in my finally completed aviary
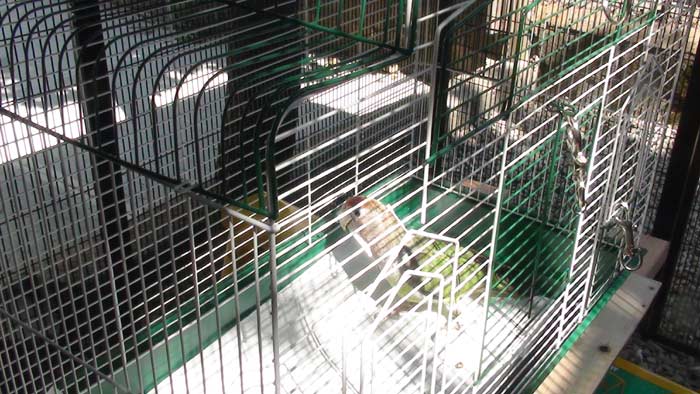
Truman inside of a cage in the aviary
I did not want to put Truman's cage on the ground but nor did I want to hang it from the aviary top. So I devised a provisional table with a set of saw horses, two by fours, and a sheet of plywood. I set Truman's cage down on it. He started climbing again but I waited to see what he would do. After a minute of hanging near the cage top he changed his mind and climbed back down. Thereafter he remained on the bottom and found no more need to climb. I left him outside like this for nearly two hours but I took Kili back inside with me. Later that evening was the first time in a week that Truman exhibited at least the slightest interest toward food. I plan to continue having him spend a bit of time outside each pleasant day in this manner until he fully recovers.
My World Record 20 Parrot Tricks in 2 Minutes has now received over one million views on youtube. I would like to thank everyone who watched that and my other parrot videos. But most of all, I would like to thank my regular readers and youtube viewers because if it weren't for them, I wouldn't be making all of these videos. It is because of their continual support that I have been motivated to put in all the work of capturing and presenting the parrot training that I normally do for my own pleasure anyway.
Actually, the footage was seen much more than a million times. Between all the unauthorized copies of the video floating around the internet and the fact that it was featured on Japanese television, I wouldn't be surprised if it had been viewed at least another half of that outside of my youtube channel (or more, really not possible to count). Here is a small selection of websites the twenty parrot tricks in two minutes video was featured on:
I'd like to answer a few of the frequent questions I received about the video. I am going to try to paraphrase them from memory:
How long did it take to teach Kili 20 tricks for the video?
The video was taken in early January of 2010 while I acquired Kili in September of 2008. This would mean that I would have had Kili for about a year and four months by the time the video was recorded. Considering I didn't start training her immediately and that she had known these tricks for some months before I made the complete video, basically it took one year of consistent training to get her to that point. I estimate an average of an hour of training per day across that range would mean that I spent around 500 hours training her to be able to do that. Please don't forget that she knew 25 or closer to 30 behaviors by that point but I chose not to include some for lack of time.
Why did you choose to do 20 tricks in 2 minutes?
I wanted to create a high paced medley to show all of the tricks that Kili knew up till that point. I was having a hard time counting how many tricks she knew in total but I was certain she knew at least 20. I thought it would sound nice to do 20 tricks in 2 minutes and I knew it couldn't take much longer or I'd lose the viewers' attention span. So I simply set this as my goal and attempted it. I had no idea if it was possible or not until I began rehearsing it and doing some time trials with Kili. Originally it was taking closer to 3 minutes but with mistakes here and there so I was convinced that if I could move quickly and organize all of the props in order, I would be able to make it in 2.
How many takes did it require to make the video
It took around 30 tries to get the performance required and in time. One of the difficulties was that she would have to do all 20 tricks accurately and quickly. If she messed up just one trick, whether in the beginning or the end of a run, the entire video was compromised. I wanted to show the entire sequence in a single uncut video so that people could see that a single parrot really did all those tricks in such a short time and without any fancy editing.
What was the hardest part about making the 20 parrot tricks in 2 minutes video?
Actually, believe it or not, the hardest part was for me to remember the order of all the tricks I had to cue Kili and when I could give her treats. I made a list of the tricks in order and highlighted the ones when there would be time to give her a treat. Unfortunately it wasn't big enough and I couldn't see it while I performed it. So I was messing up a lot at first with the order and that was slowing me down. One of the reasons we had to practice a lot was so that I could get the order right. Also I wanted Kili to get a bit accustomed to the order so she would be able to do it quicker as well. She was actually performing very well at first but beginning to lose focus by the time I got the take I would use. This is why I was caught assisting her with hand cues on a couple of the tricks cause it was the only way I could encourage her to do them quicker. I think it was on wings and turn around that I showed a hand cue in addition to verbal. In earlier takes I had her doing them strictly off the verbal cue but by the take I used, she wasn't opening her wings wide enough unless I showed her the signal.
The training was complete by this point and Kili knew all the tricks well. The challenge was sooner to have her stay focused and perform quickly rather than demonstrate knowledge of the tricks themselves. Under a little bit less pressure and slower pace, Kili was able to perform all the tricks flawlessly. In fact I was a bit peeved that she did a fantastic run during practice but then wasn't doing as well for the video. There were a couple rough spots in the routine that ended up in the video. I would have liked to have perfected those but I was really tired and so was Kili after so many takes. I really didn't want to have to leave all the props out in their spots for yet another day so once I got a workable run through, I decided to call it quits.
What's the song in the background? Was it playing during recording?
The song is called Paradigm Shift by Liquid Tension Experiment. They are an instrumental offshoot from Dream Theater and make some incredible music. I chose the song to match the high paced excitement of doing the routine so quickly. The music was not playing during recording but was mixed in afterward. While the distraction may have been a concern, it was mainly that it sounds better if mixed on computer rather than through the microphone. I have trained Kili in the past with music playing or noisy environments so I know that she could do it. As long as she can see me and hear the cues she will perform if she is motivated enough.
Who was holding the camera?
My then girlfriend, Kathleen helped me record the video. Following all of the action was no less of a challenge than performing the routine with Kili itself. I configured all the tricks around a semicircle so that the camera could follow me and the bird around and have the tricks be sequential. This was the only way to keep things moving quickly and show it all uncut. It took several takes to learn the camera tracking but fortunately that was perfected by the time the bird improved at the routine.
Did you intend for the 20 parrot tricks video to become this famous?
While I didn't have specific intentions or guesses at the magnitude of the popularity, I did hope this would be my most popular video. I was actually pretty disappointed that my Flighted Parrot Tricks Medley did not become popular. That was a well developed video that demonstrated a lot of advanced tricks involving flight but for some reason it just did not take off. It was meant to replace my Play Dead and Other Tricks video as an update of Kili's talents but just wasn't happening. So I set out to make an even more awe inspiring video.
Surprisingly, the 20 parrot tricks in 2 minutes video didn't take off immediately either. Viewers liked it but didn't really give it much thought. It took over half a year until the video got really noticed and went viral on the internet. Now people are acting like they made an incredible discovery when they post the link. But really the video has been around a while and just wasn't so noticed before. Also it by no means Kili's most complicated video. I have videos where Kili does a four piece puzzle and another where she does 4 rings on peg by color. And these videos came way before 20 parrot tricks. So in some ways I actually had to dumb down her routine in order to be able to meet the target 2 minute time frame. I couldn't show the puzzle because it takes nearly a minute for her to complete. I reduced the rings on peg by color to just 2 for the video so that it still demonstrates a knowledge of colors but eliminates the delay.
What treats are you feeding the parrot?
She likes many foods so I can use any of a number of things. Often I just giver her seeds and stuff out of a typical parrot seed mix. Other times I'll give her apple, banana, almonds, peanuts, oatmeal, bread, popcorn, or even pellets as treats. She's not that picky. She just likes getting rewarded. However, in the video I think I mainly used little peanut crumbs as treats because they were the fastest treat she could swallow whole and yet motivating enough for her to work for them.
Why did she take so long to flip the card?
The issue was that it was getting too repetitive. I had run through the entire routine with her many times trying to improve the timing or get a perfect take. She was figuring out on which tricks she was getting the treats and which ones she wasn't. She knew damn sure she was not getting it after the card so she didn't want to do it. I later began making the rewards more random but it was still difficult to do because there were certain tricks I couldn't reward after in order to maintain the flow. The ideal way to do this is to practice with the treats coming completing at random so that the parrot has to attempt all the tricks to see when it gets the rewards.
Is your parrot special or can any parrot do tricks like this?
I don't believe that Kili was born with any special capabilities that any other Senegal Parrot would lack. She's a pretty ordinary parrot but I just took the time to teach her one trick after another. I'm not sure how the speed would work with other species but I think any parrot can learn 20 tricks. Duke the budgie had learned over 10 tricks and demonstrated 8 in under a minute. So if a parakeet can learn so many tricks, I don't see why any parrot couldn't do at least the same.
Is the world record official? Is it in the Guinness Book of World Records?
No, it's not an official. I don't know of any record keeping in regards to parrots anyway. I simply thought it would be cool to call it that because I have never seen any parrot come even close. I have not met or seen a video of another parrot that could do 20 tricks period, let alone all 20 in just 2 minutes. Most parrots used in shows are actually far less skilled. They are often taught just a few tricks and then they interchange parrots based on the trick they want. However, with Kili I wanted to show that a single parrot can know so many tricks and do any of them on cue. If anyone knows of a parrot that can do more than 20 tricks and/or quicker than in 2 minutes, I would definitely like to know.
So what's next? Are you going to try to beat your own record?
I am putting a lot of focus into training Truman right now and would like him to eventually be capable of the same routine. There are some new tricks I am testing on Kili but in the future I would like to do 15 tricks in 1 minute and using only a single treat. This wouldn't be a greater number of tricks shown but would demonstrate a quicker pace, fewer mistakes, and variable ratio reinforcement at its max. Ideally I'd like her to do the tricks for the sake of doing the tricks.
How can I teach my parrot the 20 parrot tricks in 2 minutes routine?
Well you've come just to the right place. I started the Trained Parrot Blog to share with everyone (for free) how I teach Truman all of the same tricks from the very start. You see with Kili, I never really recorded the training sessions. She was my first experience so I really didn't even know if the tricks would work. I simply recorded results as they came. However, having succeeded with Kili and Duke, I feel that these same techniques should work on Truman. He's become used to cameras/lights from the day I got him so he's by no means camera shy. I simply record all of my training sessions and then share the results here on my blog. So keep checking back and I will show you how I train Truman the 20 tricks routine all from scratch. There's no need to spend a fortune on books, dvds, seminars, or online programs because I'm willing to show you how I do it just for the hell of it. Feel free to subscribe to the blog so that you can receive email updates when new articles come out. I would recommend you get a set of parrot training perches because they make training much easier (particularly for flight) and you can see that I used one for the first portion of my trick routine in the video.
Trained Parrot is a blog about how to train tricks to all parrots and parakeets. Read about how I teach tricks to Truman the Brown Necked Cape Parrot including flight recall, shake, wave, nod, turn around, fetch, wings, and play dead. Learn how you can train tricks to your Parrot, Parrotlet, Parakeet, Lovebird, Cockatiel, Conure, African Grey, Amazon, Cockatoo or Macaw. This blog is better than books or DVDs because the information is real, live, and completely free of charge. If you want to know how to teach your parrot tricks then you will enjoy this free parrot training tutorial.
Trained Parrot site content Copyright 2010-2020 Michael Sazhin. Reproduction of text, images, or videos without prior permission prohibited. All rights reserved.