Macaws:
Red Shouldered (Hahn's) Macaw
Severe Macaw
Blue And Gold Macaw
Blue Throated Macaw
Military Macaw
Red Fronted Macaw
Scarlet Macaw
Green Winged Macaw
Hyacinth Macaw
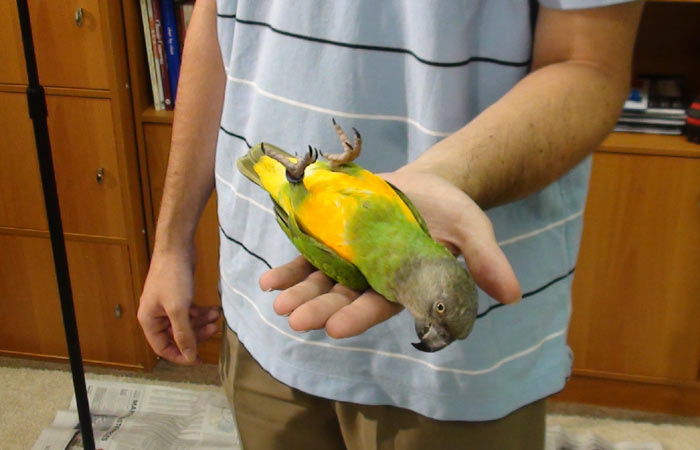
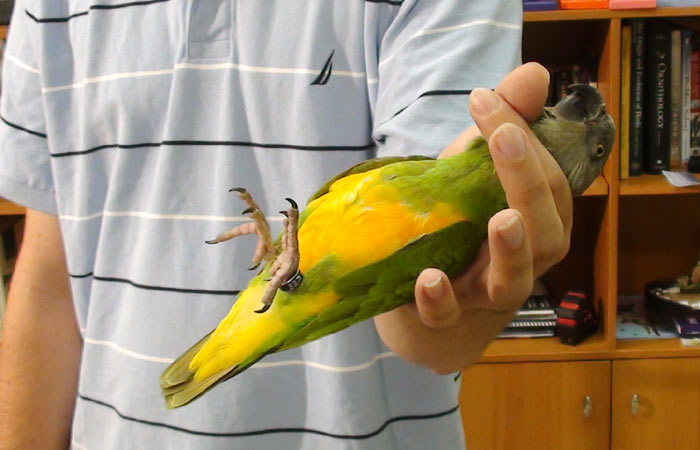
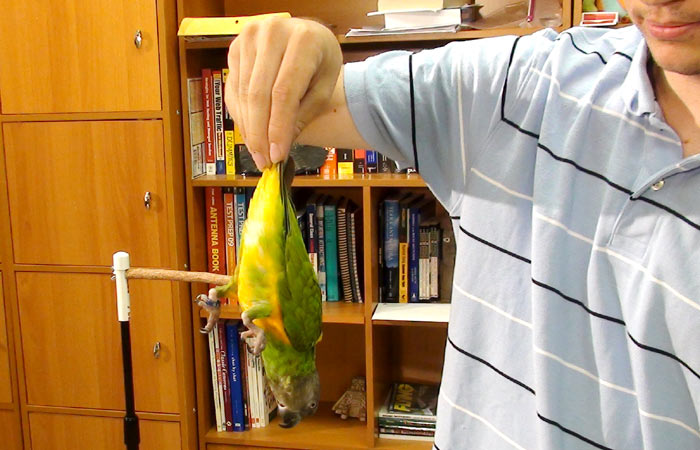
Between all the physical therapy and trick training that's been going on with Truman, behind the scenes I have also been doing a lot of taming exercises with him as well. Just like Kili, I can now hold Truman on his back, open his wings, hold him by the neck, hold him by the tail, and hold him by the beak.
Actually the holding by the beak trick is unique to Truman. Although I can sort of get away with holding Kili in this way, her beak is just too small to get any sort of grip by. But by sliding my finger into Truman's beak, I can lift and hold by his maxilla. This does not only show tameness but also very strong trust between trainer and animal. He can easily crack almond and walnut shells with that powerful beak, yet he is very gentle with my fingers and lets me hold him that way. For me it provides an alternate way to hold him but also helps to maintain the beak/hands comfort between us. If my hands and his beak interact on a daily basis then there will be no fear for either of us.
The primary training method I have been using for developing all of this tameness with Truman has been flooding with negative reinforcement. Now I am definitely not suggesting this for everyone, but just sharing what worked for me. Keep in mind I have previous training experience and am working with a baby parrot. I absolutely do not recommend this method for aggressive, problematic, or older birds. I believe that the main reasons this seemingly unrewarding technique is working so well for me is because Truman is so young and eager to learn. He doesn't develop a negative association for me as I am increasing the discomfort gradually. I'm definitely not pushing him straight to the limit. There is no need for positive reinforcement (although he gets some scratches and praise anyway) because he is not actually doing anything. He is learning through negative reinforcement that if he puts up with what I want to do without resisting, he can get it over with and we'll proceed to better things.
To hold Truman by the tail I took slow steps to get him ready for this. I definitely didn't just do it out of the blue. I had been accustoming him to being held on his back so now the main difference would be by where he would be held rather than the angle. I began by holding him on his back in my hand and touching his tail. I would increase this with each step by holding the tail and releasing part of the weight from the hand that was holding his back. I kept practicing this just a few times a day over a few weeks and now he trusts me to hold him by the tail. He is flighted so he's not scared of falling and I'm not too worried about dropping him then. Please don't ever subject a clipped parrot to this though.
By handling my bird in all different ways every day, the overall tameness improves. Unlike trick training which is accelerated to facilitate quick learning, taming is about going slow and only over time developing a comfort zone. This comfort zone is very important though. Sure holding by the tail might just be silly but being able to hold the parrot by the neck or beak can be quite important. Holding by the neck allows for carrying a flighted parrot through an unsafe zone (that is how I carry him the few yards from home to aviary) and is also useful for restraining the parrot during grooming/vet exams. The ability to hold the beak reduces fear of the beak, biting, and can be useful if any beak care is required. This article isn't meant to serve as a lesson on parrot taming, however, a previous one I wrote should be more helpful. It shows how to tame parrot to open its wings and hold it on its back. The same concepts can be applied for the other tameness demonstrations I show as well.
Here is a video to show Truman's little trick routine which consists of shake, wave, target, and fetch as well as his latest tameness demonstration. Although he was tame from the day I got him, there is no way he would have allowed me to do the things I show in this video without all the work we did. Also this is the first video where he can do shake and wave interchangeably. It took much longer to get him used to doing the trick I ask for rather than just one or the other.
This free training guide is about how to train a parrot to shake its head no on cue. The trick involves the trainer shaking a finger or saying shake to the parrot and then the bird shakes its head in response. The trick is intended for parrots and trainers of all levels, including beginners. It can be taught to any sized parrot from a budgie to a macaw, however, it tends to be easier to teach to all but the smallest parrots. This can be taught as the first trick, however, I suggest teaching at least one or two tricks prior.
The behavior I used for the shake trick on both Kili and Truman is reflexive and innate. By blowing across the parrot's face, particularly the nostrils, it makes the bird shake its head much the same way it does to shake off food, dirt, or bugs. Therefore, unlike the wave trick, there is no need to shape the behavior itself. It is merely a matter of inducing the behavior and capturing it on cue.
For some reason, this technique doesn't seem to work for smaller parrots like budgerigars, parrotlets, lovebirds, and cockatiels. You can still try by blowing across the face from different directions and see if you can get them to shake. If not, you can either use a clicker and capture when they shake their head naturally or you can follow the procedures for shaping the nod trick but instead do it from side to side.
To teach your parrot to shake, simply blow on its face and when it shakes its head, click and reward. If you are having trouble getting the shaking action, just switch the direction you blow. Try the cheek, nostril, eyes, etc, until you can find a place that gets it to shake every time. I had made an attempt to teach Truman to shake over a month prior but it didn't seem to be working so I gave up. But recently I tried again and it worked. I probably just wasn't hitting the right spot last time. So definitely be patient and try blowing in different places around the head before you give up.
I suggest teaching the trick out and away from the cage. Most preferable is a training perch because it keeps the parrot at a convenient height and distraction free. Otherwise you can try doing this on a chair back or table. Although it can be taught with the parrot on one hand, it is really preferable to have both hands free. This way you can use one hand for displaying the cue (shaking your finger or whatever you want it to be) and then use the other hand to hold the clicker and the treat. I like to say the cue, shake my finger, and then blow. I both say the command and show the visual command to the parrot so that it can learn both cues together. Eventually I can use one or the other to cue the trick.
The more important, and somewhat more difficult part, is reducing the reliance on inducing the shake by blowing and having it come from the cue. Primarily it is going to rely on extended quantity of repetitions and motivation. Just keep practicing the trick while showing the cue and blowing simultaneously until the bird catches on. From time to time don't blow to see if the bird will offer to shake its head without blowing on it. Usually this will happen after a bit of a break between training and high motivation. The parrot will get impatient and offer the trick after seeing the cue and before you can blow on it.
If you are following my training program, the order I taught tricks to Truman is as follows:
The exact order you train in isn't critical but my order is such for specific reasons. Since my parrot is flighted, flying to me was a necessary requisite skill. Then I proceeded to click condition Truman and teach him to target as his first behavior. Then I taught him to wave as his first cued trick. Next I switched to a prop based trick and taught him to fetch. Shake is a good trick to follow since it is actually a very easy behavior to teach. In fact, shake is easier to train than wave. This makes it a good follow up trick because interference from the other trick is likely and working on an easier behavior to teach cue differentiation is most important.
The biggest reason I like shake as the second cue based trick is because it can be forced. If wave is the first trick and the parrot is waving instead of nodding, I can "force" the bird to do the second trick by blowing on it. The bird will shake and I can reward. This way I can force the trick to be performed for the sake of rewarding it. If it's a more voluntary behavior, it may be hard to get the bird to do it, especially if it is confused and trying to do the wrong trick.
By the second major training session, Truman was already shaking his head on cue. Unfortunately I reintroduced him to wave the same day so he began getting confused. Wave has been causing interference ever since and he often waves instead of shaking. The only way to solve this is to continue practicing both tricks and reteaching, using the original training methods, whichever trick he is doing incorrectly. Nothing can help here beyond patience and lots of practice. Eventually the bird will just get it. For these reasons, if you are teaching shake as the second cue based trick, it won't be the method of teaching the tricks that will be the challenge but rather differentiating it from the first trick and teaching the parrot to watch for the specific cue.
Since the vet confirmed that Truman's pelvic bone has healed, I have begun more intensive physical therapy with him. This involves several things. First off, I hold him on his back and move his leg up and down. I begin by testing on his good leg to check how far it should normally move. Then I repeat the same on his bad leg. I apply mild be definite pressure as it is this that stretches and exercises the muscles. Other exercises include side to side motions of the leg, step ups, and now also wave trick.
I have been doing progressively more and more step ups with Truman every day. Not only am I encouraging him to step up, but I am also alternating between stepping with the good leg first or the bad leg. Either way, at one point he must hold his entire weight on one leg but by alternating which leg goes first, it effects the muscle groups that are being worked. He seems to prefer to step with his bad leg first so I am trying to force more step ups with the good leg first by putting my finger specifically in front of that leg.
Truman's reward for these exercises is predominantly negative reinforcement. I am forcefully applying the exercise upon him but stop at a random time if he is cooperative. Since it requires little positive behavior on his own part, it is mainly a matter of him not resisting. Since he is used to being handled, this is not too stressful for him and he just needs to endure for a little while and then knows I will stop. I am also providing praise and petting as a mild positive reinforcement upon completion. I do fewer repetitions but repeat frequently throughout the day.
Finally, the first major sign of recovery is that I was able to retrain Truman to wave again. For a month and a half he did not wave because it would force him to put all of his weight on his bad leg which he could not do. But with the good news from the vet, I decided to try to get him to wave now. I realized that it may take longer to train it again this time not because he would have forgotten the trick but because he would need to recover strength in his leg to be able to stand this way.
At first the training progress was slow and he wouldn't even so much as try to lift the foot to wave. Clearly he wasn't doing it on cue. I tried to repeat the wave training method in order to reteach him what I want for him to do. I would reward even if he so much as would lift the foot off the perch. Surprisingly though, he was picking things back up very quickly and within 5 tries he had a sort of wave going and by 10 he was already waving on cue as good as ever. This demonstrates much greater strength in his bad leg than previously anticipated.
The recovery progress had probably already been happening but accustomed to the pain, Truman did not try to use his leg in full. But with my encouragement through positive reinforcement training, Truman is regaining function of his leg much more quickly. With today's progress he is back to 90% of his original state and I would guess that at this rate he should be back to 100% within 2 weeks. This was an exciting breakthrough in Truman's recovery progress. You can expect to see more trick training updates soon. Here is a video of the physical therapy exercise and how I retrained Truman to wave again.
The first time I heard that someone else's Senegal Parrot could crack almonds, I was simply astonished. It just did not seem to me by the look of that beak that a Senegal could take an entire almond shell in its beak and snap it in half like a nut cracker. Likewise I was surprised that my Cape Parrot with quite a suitably sized beak for the job couldn't crack almonds either. Read on to find out how I taught both of my parrots to crack almonds on their own and how my Cape Parrot can even crack open a walnut now.
At first though I could give the parrots a nut and they would play a little bit but then eventually discard it. They were not motivated to spend a lot of effort chewing the nut because they were unaware of the fantastic reward inside. This is where I needed to provide some help.
I learned that baby parrots do not come with the knowledge required to just break open a nut so some assistance is required on our part. The first step is to introduce the parrot to the food within the shell itself. By letting the parrot play with it, it will quickly realize that it tastes good and want more. The next step is to let the parrot play with the shell. Parrots are destructive and naturally enjoy breaking things so no doubt they will enjoy chewing up the shell itself. Use a nutcracker to break a nut and just give the shell to the parrot to experiment with.
Next start introducing the parrot to the concept that there is a tasty nut inside of the shell and it requires breaking open. At first try to break the nut directly in half and let the parrot eat the nut out of the half shell. Once it is has figured this out, you should be able to crack the nut progressively less and less until you no longer need to crack it at all. When introducing your parrot to its first uncracked nut, try to find the smallest one possible and that has some defects pre existent in the shell (such as small chips/cracks). If the parrot can succeed at breaking an easier nut on its own, it will be more motivated to spend long spans of time working on the difficult ones.
It turns out that my Senegal Parrot can crack open an almond and my Cape Parrot can even crack open a walnut. I realized that they do it somewhat differently than a nutcracker. Instead the parrots learn to chew open a hole in one side of the nut and then use the tip of their beak to scoop out the nut from inside or chew the hole wider. This is why parrots can still eat a nut that would otherwise seem too large to break with their beak. So go ahead and give it a try and just make sure that the parrot continues being rewarded all along the way.
This process probably happens naturally in the wild. Young parrots learn about nuts and difficult to reach foods by watching other parrots eating them. Furthermore the juveniles can find leftovers discarded by older parrots and nibble out what's left from the shells cracked by adults. We can simulate this same process by letting them watch us consume nuts and pre-cracking some for them to try.
I just wanted to share in a single post/video a demonstration of Kili's tameness. I realize that people have seen bits and pieces of it here and there but I wanted to consolidate it all to one place. I continue practicing all of these taming techniques from time to time to maintain tameness. I just casually touch or grab her in different ways so that she remains very used to hands. To learn a bit about beginning this taming process, check out this article.
I can touch Kili anywhere including the places parrots tend not to like being touched like under the wings and tail. Also I can grab/hold Kili by anything. Obviously I can grab by her feet but also can grab by her back or neck. She doesn't mind being grabbed by the head and I'm sure it doesn't hurt her because I see her hanging by her beak alone from time to time. Kili lets me pull her wing and tail feathers open. Most impressively Kili let me grab and hold her by the tail. This requires absolute trust. Here are some pictures and video:
Trained Parrot is a blog about how to train tricks to all parrots and parakeets. Read about how I teach tricks to Truman the Brown Necked Cape Parrot including flight recall, shake, wave, nod, turn around, fetch, wings, and play dead. Learn how you can train tricks to your Parrot, Parrotlet, Parakeet, Lovebird, Cockatiel, Conure, African Grey, Amazon, Cockatoo or Macaw. This blog is better than books or DVDs because the information is real, live, and completely free of charge. If you want to know how to teach your parrot tricks then you will enjoy this free parrot training tutorial.
Trained Parrot site content Copyright 2010-2020 Michael Sazhin. Reproduction of text, images, or videos without prior permission prohibited. All rights reserved.