Macaws:
Red Shouldered (Hahn's) Macaw
Severe Macaw
Blue And Gold Macaw
Blue Throated Macaw
Military Macaw
Red Fronted Macaw
Scarlet Macaw
Green Winged Macaw
Hyacinth Macaw
I hate cleaning cages. I'd much rather be spending my time training or hanging out with the birds. I don't actually mind the "ick" of cleaning poop so much as taking the time to do it. But it's a fact of life when it comes to bird ownership and something that must be done. This is why I am keen on good cleaning products that reduce the amount of time/effort I need to spend cleaning.
Recall my Must Have Cleaning Devices for the Parrot Owner article reviewing cleaning gadgets. Well in addition to good gadgets, you also need good cleaning supplies. Paper towels do just fine, but on a tight budget washable rags are a good idea. I find that dish soap and bleach work very well for a thorough cage cleaning, however, it smells awful and takes a long time to prepare. Worse yet bleach stains and requires gloves for use. I'm so worried about the fumes that I have to lock my parrots out in the stairway. There has to be a better way.
Since I got Truman's Cage from Kings Cages I was already familiar with the brand. I've been using a bunch of their products for a while now and one of them is the Royal Cage Cleaner spray. This spray makes cleaning a whole lot easier. I just spray it on and wait 5 minutes, come back before it dries, and wipe off with a wet paper towel.
Frankly, I prefer my steam cleaner because it is an entirely chemical free way to clean and sterilize the cage. The trouble is that it has a very narrow stream so it takes forever, especially when it's a wide spread mess. For hard to reach crevices like in the grooves of a perch, I'd definitely go with steam cleaner. But on cage bars, grates, and particularly seed catchers, the spray is awesome.
I tried a different cleaner before, don't remember the name, but it was a citrus based cleaner. It smelled good and is supposedly very safe but it would leave a lot of residue after cleaning. I like the Royal Cage Cleaner better because it has very little residue. Wiping with a wet paper towel once gets most of it and a little more effort and it's all gone.
For the absolute worst messes I use a combination of my steam cleaner and spray. First I spray the area to dissolve the poop. Then I wipe what I can and blast the rest out with the steam cleaner. Works like a charm. For spot cleaning, $10 for the spray is well worth it. One bottle lasts me about a year because I combine with the steam cleaner.
I have one bottle of free Royal Cage Cleaner to give away. The contest is very simple. Just leave a comment below or on the Trained Parrot Facebook page telling me about what you currently use for cleaning your parrot's cage. Contest ends midnight Tuesday November 26th and a winner will be chosen at random and announced Wednesday. The only restriction I have here is that free shipping is in the US only. International winner must pay international shipping or decline the prize and another winner will be selected. Winner to be selected from either comments section or facebook comments at random. Thanks for reading and participating.
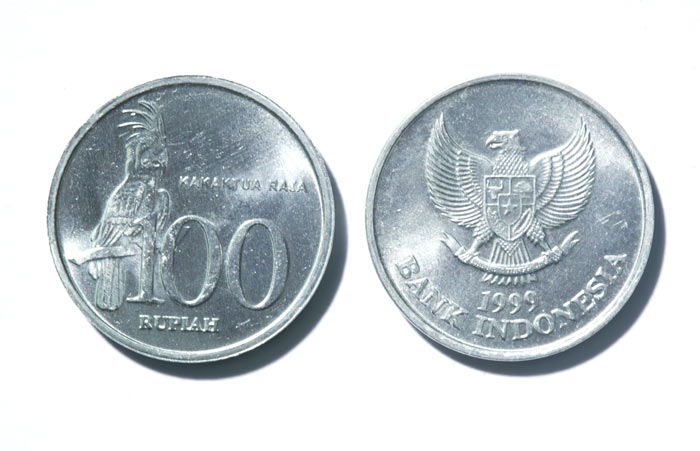
If you recall my trip to southeast Asia, you'll remember that I brought back a bunch of really cool parrot coins that I picked up in Indonesia. After a little clean up and product development work, I now have an awesome gift set for parrot owners.
Until now, everything I've sold on the Parrot Wizard Store website was specifically meant for parrots. However, now for the first time I have an item that is specifically for parrot owners. This is a gorgeous 100 Rupiah Palm Cockatoo Coin from Indonesia. The coin demonstrates the country's pride in providing a native home for the majestic Palm Cockatoo which inhabits Indonesia in New Guinea.
I encapsulated the coin in a clear plastic capsule for protection and then put this inside a stylish leatherette gift case. But this set features more than just a coin. Parrot artwork decorates the box and certificate inside which explains the origins of the coin as well as some facts about the Palm Cockatoo. But that's not all. 10% of every sale of this coin will be shared with the World Parrot Trust to promote conservation of endangered parrot populations. It is most suitable that some of the proceeds from the Palm Cockatoo Coin go to the World Parrot Trust which embodies the Palm Cockatoo as its logo mascot.
This Palm Cockatoo Gift Set makes a great gift for any parrot lover. I'm sure any parrot owner would appreciate the conservation contribution as much as the excitement of having a coin with a parrot on it! So go ahead and order the Palm Cockatoo Coin for yourself, parrot owning friends, or as a gift for someone in your family that loves parrots.
Keep in mind that it pays to order multiple items when shopping the Parrot Wizard website. Shipping on most items is $3.49 for the first item you buy but then just $1.75 for any additional items. So buy a coin for yourself and another for a friend. Or better yet, get a toy for your parrot too while you're at it! For more pictures/details about the coin and to place an order, visit the product page:
International shipping will be available for just $5.00 USD more than the standard US listed price. If you're interested in ordering this from outside the US, contact me directly on the Parrot Wizard Website. For any kind of bulk or special request orders, just contact me and I'll see what we can do. Here's a promotional video of Kili and Truman helping me feature the coin.
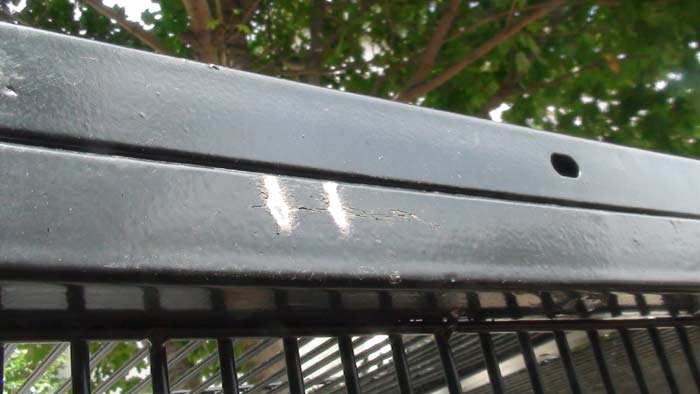
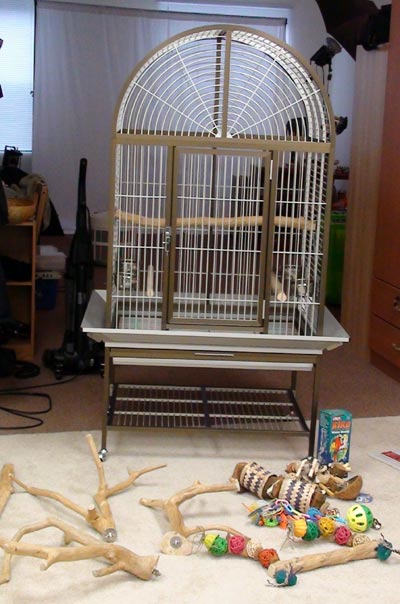
For some time now I have been contemplating upgrading Truman to a larger travel carrier. Unfortunately his carrier is no bigger than Kili's even though he is a bigger parrot. Generally this has been fine for short outings like taking him to the vet or on a short drive. However, I have begun taking him on overnight outings lately and long drives. Not only is the carrier confined, but also boring for him. I think boredom leads him to a lot of screaming during the drives. Most of this would be manageable but my biggest complaint is that he ends up stepping off his perch into the poop below. Just stepping in poop is never enough. He ends up getting it all over his beak, the walls of the carrier, and everywhere as he is playing with the paper towel. Also his tail keeps hitting the walls as he turns around, so he comes out quite scraggly looking.
I would gladly put his perch higher (like in Kili's carrier), but since he is so big, any higher would cram him against the top of the carrier. Thus I set out in search of a new travel carrier. My main criteria was that the carrier must be about 4 inches taller so that I could raise the perch 3 inches and allow an extra inch of head room. Of course I must be able to modify it to add a perch but toy hanging options are also important. I wanted a few inches more to the width but not really the length. The length gives him more than enough space as it is. Finally, I like having a cage style top loading door for putting him in and cleaning. Most pet carriers have a side door only which is unsuitable for a parrot.
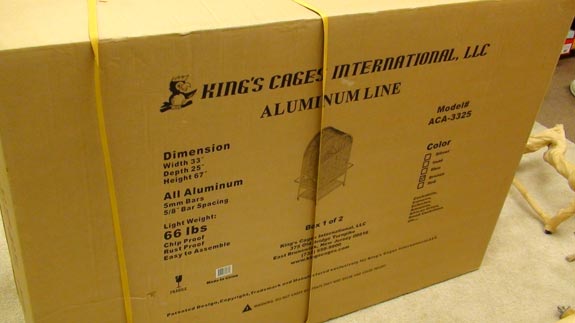
At PetSmart I actually found the same version as his current carrier but one size larger. I was really excited because I liked the design I initially chose. Unfortunately it turned out that the bigger version was several inches longer but barely an inch taller or wider. This was of absolutely no use to me. Since I bought Truman's cage, I was aware of a travel cage made my Kings Cages. I have thus far been reluctant to buy it because of price and weight. I began considering it again since seeing it at the Bird Paradise Parrot Palooza. However, they lied about their products being 20% off which was a major turn off from buying the cage there.
I had no luck finding a plastic carrier to modify and replace Truman's carrier, so I considered the Kings Cages Travel Cage some more. I got to see it in person and my first reaction was that it was too big, too heavy, and too expensive. This was the same feeling I got the previous times I've seen it which was why I did not buy it previously. I decided to compare to the smaller version of it. Despite being made out of aluminum, it weighs a hefty 14lbs without the parrot, toys, or perches.The small Kings Travel Cage is more affordable and the 8lb weight is acceptable. I was not disappointed about the lack of a grate or food doors. I could always hang my own food bowls and keep the perch high instead of a grate. However the 14" cube dimensions were unsuitable. It would hardly serve as an upgrade from Truman's current carrier. Furthermore, I discovered that the bottom is not held in and can fall into the cage. It cannot fall out, but there is nothing stopping it from falling in.
Realizing that the small carrier was not an option, I continued deliberating with myself about the medium one. I even got permission to bring the sample out of the store and check how it fits in my car. Luckily it just fits on a seat and the seat belt just reaches to secure it. I even held Truman next to the cage to see how he would fit inside of it. Finally I was convinced by the incredible discount I was offered to purchase the travel cage. 30% off the online standard price is no cheap Bird Paradise trick. Even at $150, the travel cage is quite expensive. This is really the absolute max I would pay for it but I knew there was no way of finding it any cheaper or a better alternative elsewhere. So I went ahead and bought the cage for Truman.
I discovered that the medium travel cage does not come with a top handle perch like the cheaper small cage does. I brought this up and was given a perch dowel for free to screw on myself. Being handy, this was not much of a problem for me but I find it disappointing that the more expensive cage lacks an awesome feature of the cheaper version! If I could make one complaint about Kings Cages is that the more expensive the products they make, the more they cut corners. The cheap economy cages come with stainless steel bowls while the expensive aluminum cages come with worthless plastic cups. The travel cage came with these cheap cups but I don't intend on upgrading them unless Truman chews them to bits. I wouldn't be surprised if he does; he chews plastic bottle caps into a pulp in under twenty minutes. I'm mainly counting on the fact he won't have enough time in the travel cage (and that I will only leave cups in briefly during feeding) to destroy the cups and want to save on weight, space, and money from upgrading to stainless steel ones.
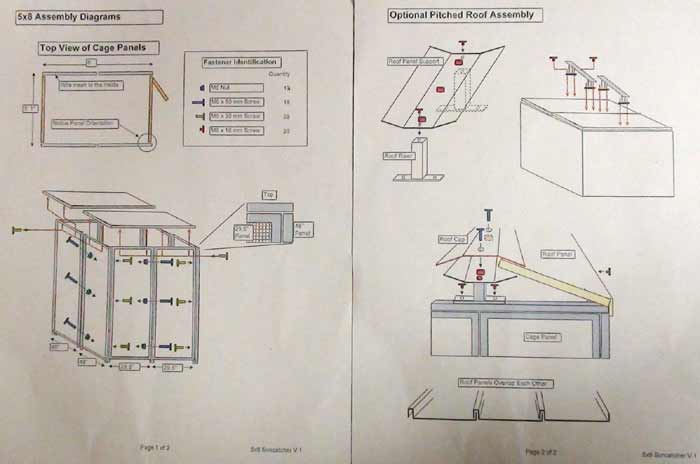
Assembly
I let Kili and Truman stay out to watch the assembly of their new travel cage. The reason I say their is because they will each continue to have a carrier but will take turns spending time in the travel cage. My brother helped assemble the cage. Assembly is quite easy and takes no time at all. No tools, hardware, or skills are required. This definitely puts Kings Cages ahead of others for people who need the product without the complexity of assembly. The hard part is figuring out the orientation of each piece but luckily they only go in one way. Once the inner tabs are lined up, it's just a matter of pounding the parts until they lock into each other. The best way is to turn the parts such that you can hit down with your hand and allow gravity to help.
The four sides connect first and then the top is added to hold everything together. The poop pan and grate slide in like a normal cage. Yet, unlike the normal cages, the travel cage has a rotating flap to prevent them from sliding out. This is fantastic and I'm disappointed the bigger cages don't have this feature as well. The large door is built into the front panel, so no mounting of a door is required. The door spans the entire front so it is very easy to access the inside. The food doors are built into the front door which makes it easy to open the cage door to refill the cups without need of taking them out.
The included perch is a machined dowel with notches. It is easy to drop in place. Gravity holds it down but unfortunately driving on a bumpy road could allow the perch to bounce upward. I do not recommend using the included perch as a primary. In fact, it is almost mandatory to have two perches inside. I placed the included perch toward the front of the carrier to facilitate easy access to the food bowls for the parrot. Then my brother helped me by cutting and bolting a dragonwood perch slightly back of middle. I selected dragonwood because the bark is more porous and allows the parrots a good grip with their talons during travel. My brother bolted the perch on using equipment from my Traning Perch assembly kit. Instead of the wing nuts typically used for cage perches, we opted for a permanent wrench on nut instead. The added security of such a nut plus the fact that it sticks out less made it preferable for a travel cage. The notched perch can only stand at the height dictated by the cross bars it sits on. However, I was able to select any height for the bolt on perch. I did not place it dead center because that would waste space toward the back and cram the feeding perch. So instead I placed it back as far as I could go without Truman's tail hitting the rear cage bars. I also placed the main perch slightly higher than the food perch. This way the low perch does not affect him when he stands on the main one and his tail can hang below the main perch when he is on the eating one.
The final modification to make was to cut and screw on the spare dowel I received. This was easy for me but not something the average person can undertake. I used a miter saw to cut the dowel to the size appropriate to the cage top handle. Then I drilled holes through the aluminum handle using a drill press. Next I added wider holes into the outside of the handle holes to facilitate counter sinking the screw head into the handle. Next I transferred the holes from the handle to the perch by aligning it and using a drill with a smaller bit. The final step was to put 3 screws through the handle to attach the perch. This is a pretty essential modification because perching on the bare handle alone would be uncomfortable for the parrot. The method for mounting the handle is pretty strange. There are two knobs that stick out the sides of the cage and the handle snaps onto them by stretching apart and over the knobs. Then the handle is pulled upward and locked in place by pieces that rotate down. Not only is it complicated, but also looks like the most likely fail point on the entire cage.
I added two toys to the carrier. One was an old toy but one was brand new. I hung them on the sides not only to keep them out of the way but also to provide a little bit of hiding cover. Since it is a cage rather than a carrier, all sides are exposed, so it's not bad to give a little hiding. The first time I tried to put the food bowls in, it was really difficult because the plastic was not yet stretched. It's a good thing I tested them prior to putting food or water in because the first time they wouldn't budge until they snapped in all at once. After a few uses, they go in ok.
Conclusion
In conclusion, the Kings Cages Aluminum Travel Cage is the best travel cage on the market I could find appropriately sized for medium parrots such as African Grey, Cockatoo, Amazon, Eclectus, and Cape Parrot. It is not approved for air travel and I wouldn't recommend it for that anyway. A plastic carrier is still more suitable for short outings (under 3 hours), but this kind of travel cage has many uses. It's a nice cage for a parrot traveling by car frequently. A travel cage is great if you plan on spending overnight outings away from home with your parrot, but it can also be very convenient to have at home. At home it can serve as a temporary cage during cage cleaning and can also be used to cage the parrot in other rooms (like during cooking or in the presence of guests). This model definitely affords the most convenient feeding solution. The slide out poop pan and grate are nice but not really required in such a small cage. It would not be that much more difficult to clean through the door. However, since these features don't add any significant weight, it's great to have them. I would rate the cage 4 out of 5. Here's a quick summary of the pros and cons:
Pros
-Sturdy/reliable -Grate -Food doors -Aluminum (light and non-corrosive) -Carry handle -Fits on car seat -Adequate space for medium parrots -Safety door latch and magnet like on big cages -5/8" bar spacing -Selection of colors similar to cages -Looks very nice
Cons
-Expensive -Heavy -Plastic food cups -No secondary lock for food cups -Top handle perch not built in -Unsuitable notched perch -High pressure on bottom feet of cage can cause dents/scratches to surface
Stay tuned for more articles about this travel cage about how to train a parrot to go into carrier, the parrot's review of it, and videos of the travel cage in use.
Alternatively the title could be: Cages By Design, The Most Flawed Product I Have Ever Bought In My Life. I do realize that this article is very very long and so is the video. However, so much has happened and there was no way I could have shared the idiocy of what happened in anything shorter. I never planned for there to be so many problems or to hold back on publishing this article for so long. It just happened to be that this was the worst cage I have ever come across and the details of this article will sound like a riot! Really, if it weren't so frustrating it would just be funny.
This is a must read for anyone thinking of buying anything from the company Cages By Design, contemplating an outdoor aviary, has an outdoor aviary and might like to pick up a few suggestions, or is just in the mood to read the most outrageous product review of all time. I think once you get started, you won't be able to stop. Thanks for reading. Here is my misery for your reading entertainment...
Deciding to Get An Aviary
Back in July, while having lunch with my mother, we talked about how great it would be for my parrots to spend more time outside. She suggested putting them outside in my backyard in a cage so they could get some sunlight and fresh air. I immediately knew that putting them outside in a regular cage was not an option but this got me thinking. I started researching ideas about building or buying an aviary to put in the backyard. I had not previously considered this because I used to have just one parrot and didn't particularly think the backyard suitable. However, now with two birds the concept has become much more appealing.
At first, I was looking into options of building a wire mesh enclosure myself. The main things that were discouraging me were that I would have to deal with zinc covered steel mesh (zinc is toxic to parrots) and that it would end up looking really bad. I looked into the cost of materials and decided that building an aviary vs. buying one was not that drastically different in price and that a manufactured one would not only be a major price saving but also hold up better in the long run. There are very few aviaries available on the market so my selection was quite limited. I do not have a lot of space available so I wanted to find the largest aviary that would conveniently fit my area. Having seen advertisements and heard things about Suncatcher aviaries made by Cages By Design in the past, I was keeping them in top consideration as I searched for an aviary manufacturer. I was in a hurry to order one as soon as possible so that I could get the birds into it before the summer ends. I decided that getting Truman used to being in an outdoor aviary while he is still young would be best and prepare him for spending lots of summers outdoors.
Initially I was looking at their smallest aviaries but decided that in the long run it's better to go all out and buy the largest one that I can fit up front. I only had Truman for a very brief time at the point that I was deciding to get an aviary. It was right around the time (or possibly just before) I introduced Kili to Truman so I was really uncertain if the two parrots could share an aviary space together. I really had no idea how they would ultimately get along so I wanted to play it safe. I found an 8'x5' walk in aviary with a divider. Essentially it is the same as a regular version but it provides a panel to divide the aviary into two and has an additional door for retrieving the second bird out of the other side. It would be very costly/difficult to add the divider to the regular aviary later so I decided to shell out up front to buy the one with the divider and extra door included.
I was almost ready to confirm my order when I discovered a different website that was offering the exact same cage for $110 less than CagesByDesign. The other site was merely a reseller and would most likely defer the order directly to the manufacturer anyway. I pointed this out and offered to still order directly as long as they would match the other retailers price. There was practically no way they could turn this down because if I went to the other retailer, Cages By Design would still end up manufacturing the cage but would then be paying a commission or a certain cut to that retailer anyway. After a bit of back and forth they did agree to match the price.
Additional Considerations
Since ordering, I came to realize that Kili and Truman get along well enough and that I probably won't need to actually divide it. I began training them together and encouraging them to play closer and closer together. I began having doubts if the divider would really be necessary. The other add on option that I ordered was the friendly feeder system. I decided to just have the feeders put in initially (so the holes in the wire could be made at the factory) and then decide later if I want to use them or not. I figured worst case, I could just have them installed and leave them closed and not use them.
A few weeks since ordering, I was considering various security precautions involved with having my parrots outdoors. When I mention security precautions, I am as much talking about escape as theft. I live in a very dense urban environment and an intruder entering the yard is not impossible. In order to be able to use the aviary effectively, I would need to be able to leave the parrots there unattended. There would be no point for me to use the aviary attended only because then I may as well just take my parrots outside on a harness. The purpose of having an aviary is to be able to leave them in there for multiple hours unattended in the day time so they could have more space to fly and play than in their cages at home as well as getting some sun and air. Additional security concerns include other animals getting into the aviary and some sort of natural elements tipping the aviary over.
I decided to bury a wire mesh underneath the gravel in the yard and connect it to the cage both to serve as a foundation and to thwart burrowing rodents from getting in. To reduce the likelihood of someone trying to steal or "liberate" the parrots, I bought heavy padlocks to use on the doors. I considered security concerns from different angles and came up with solutions. The only major concern that remained was the friendly feeders. I called the company to find out how the feeders are connected and it turned out that they are merely screwed in with a few screws. If I am padlocking the door latch, it is pretty silly to have a feeder installed that is merely held on by a few screws. I asked if they could rivet the feeders in or come up with a more secure method but they could not. I was worried that it was too late to cancel the feeders but they told me that my cage was still in production and that they would cancel the feeders for me.
A few more weeks passed and Truman had sustained a leg injury. I was disappointed that he would not get to go in the aviary when it would arrive. I resolved not to put Kili in the aviary before Truman as she can get very territorial. I wanted to introduce them to the aviary simultaneously or Truman first so that he could be more comfortable in it. I did not have any warning of the day the aviary would arrive and was starting to worry the company wasn't sending it out. Finally on August 10th the aviary arrived. It took longer than the 2 weeks the company suggested it would take but still within their 4 week guarantee. I got a call at 9:50AM the day of delivery that the truck was coming. It turned out he was a just a few blocks away and I had to rush out to meet him. I also had to scramble to get my father and brother to come over to help carry all the parts in.
Accepting the Shipment
The truck arrived and I was prepared to collect the parts for the aviary. Lift gate service would have cost an additional $125 at the time of my order so I opted to retrieve the panels from the truck myself. It turned out that the truck did have a liftgate but the driver did not use it. Instead he passed the panels to me one at a time. His help was appreciated. I did not see any instructions or hardware amongst what we had removed so I had to climb into the truck and check amidst the packaging to see if anything was left behind. Sure enough the instructions and pack of bolts got buried in the packaging materials. I could not find anything else but was concerned that the package the aviary came in was already opened before arrival and there were parts scattered around the truck. I was also disappointed to find the friendly feeders and the holes cut out in the panels considering they told me it was no problem to cancel them several weeks back. Furthermore they had charged me fedex shipping for the feeders (because they could get damaged in cargo shipping with the aviary) and yet they came on the pallet with the aviary.
Beginning Assembly - The Problems Begin
Between the three of us, we lugged the aviary piece by piece through the building and into the backyard in no time. My brother and I continued preparations and assembly on our own beyond this point. The next thing to do was to move all of the gravel in the yard off the space where the aviary would go. It was my intention from the start to place the aviary below gravel level and then bury it into the yard. I wanted to move the gravel aside a day in advance but I did not have enough notice about the delivery to prepare in advance. It took a few hours to clean up the yard, pull any weeds, and move the gravel aside. Finally the space was prepared and I was hoping to complete the assembly of the aviary the same day. I tried to study the instructions but they were a mere two pages with nothing more than some primitive diagrams. I decided that I'll just refer to them and figure it out as I go.
Inaccurate and pretty unhelpful instructions for Suncatcher Aviary
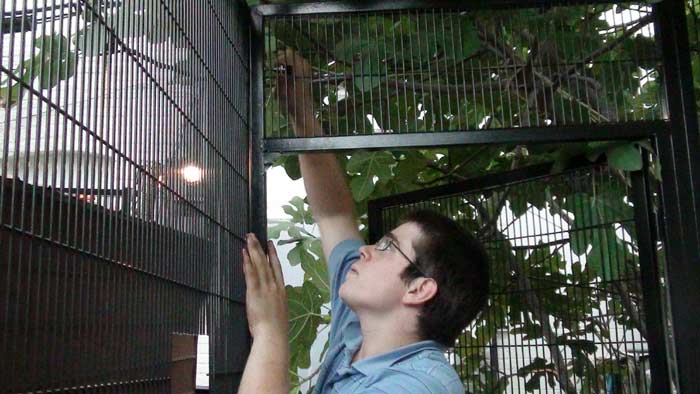
We prepared to start assembling the aviary by bringing two panels together to form a corner. I attempted to bolt them together but the holes didn't line up. So I realized that one of the panels were upside down. We flipped it over and tried again. Still the holes wouldn't line up. We tried swapping with other panels and all sorts of methods to figure out how they could possibly come together. After half an hour of being stumped by this dilemma we concluded that it must be a manufacturer defect because there was absolutely no way that those panels could be joined with the holes so misplaced. Thus I called the manufacturer to bring this up and offered to send them digital photos demonstrating the discrepancy. I also voiced a displeasure with the fact that they had agreed to cancel the feeders but cut the holes for them anyway.
After reviewing the photos the manufacturer agreed that the holes were in fact misplaced. They offered me either to ship the defective panels back and wait a really long time for a new set or to accept a $250 refund to make up for the feeders and redrill my own holes. At this point I preferred the drill my own holes option. I had already waited so long for the aviary and any more wait would mean the birds would not get to go outside this season. Furthermore I did not look forward to loading everything back up on a truck, cleaning up, and then going through the same all over again. At this point it appeared that 8 holes would need to be drilled in a different spot. Luckily I have the tools and capabilities to do this but for someone just expecting to snap this thing together it would not be possible.
You can see the hole the bolt is meant to go into is actually too low
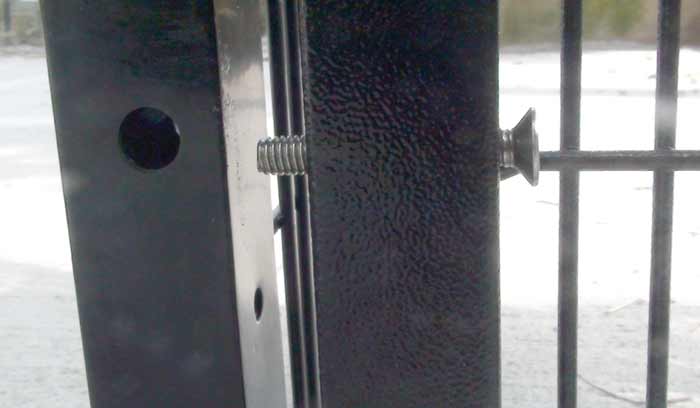
I checked the diameter of the bolts and picked a suitable drill bit. Then I measured where the holes needed to be in order to line up and marked the spot on the panel. I used an awl to prepare a pilot hole and then measured again to verify that the hole was accurately placed. Clearly someone did not hear of measure twice, cut once. Finally I used a power drill to make the suitable hole. I drilled the holes in just one panel to make sure it works before drilling any more panels. The holes lined up perfectly and it was very easy to get the bolts through. The allen key supplied with the kit is a joke. Instead I used my own ratchet wrench with metric allen key tip to have suitable leverage and back/forth motion to screw the bolts in.
More Problems
Then I discovered yet another problem with the aviary design. Some of the holes were too large and the bolt heads were falling into them. This clearly defeats the purpose of bolting things together. The solution was very simple, just a matter of adding washers to all of the bolts. There was really no reason for the manufacturer to be so skimpy and not include washers. However, for me it was not the expense but rather the extra trip to the hardware store that was a burden. I used washers for all of the bolts regardless if the holes were over drilled or not because they help make the connection more secure. Another specific tool required to assemble this aviary is a metric wrench for the nuts that secure some of the bolts. Once again without a washer they fall right in but the same washers that solved the bolt head situation, I used to keep the nuts from falling into the holes. While a metric allen key is included for the bolts, it is up to the buyer to find a suitable metric wrench.
All of the nuts fall in without washers and many of the bolt heads as well
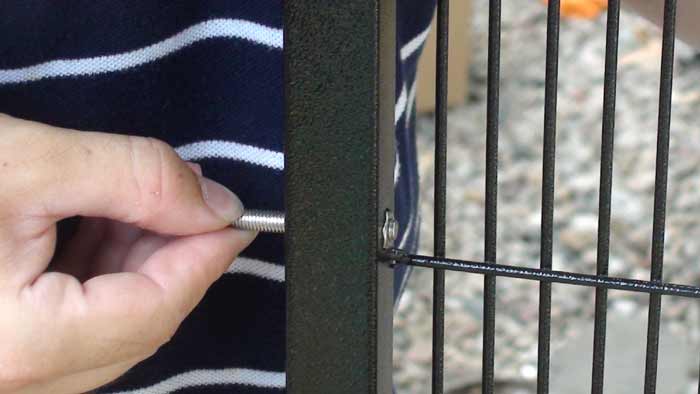
We continued drilling holes one panel at a time and adding them to the assembly. While it may have been easier to do all the drilling at once, I just wanted to be sure that each panel would custom fit. Also I was worried in case there might be any other discrepancies where the holes belong so I remeasured the whole positions specifically for each set of connections. We started getting good at this and were moving along at a reasonable pace until we hit yet another bump. By the time we were ready to mount the door we realized yet another major manufacturing mistake. The door panel has a double vertical tube construction as opposed to the single tube used on the regular panels. This strengthens the frame and creates a place for mounting the door hinges. Unfortunately the manufacturer overlooked the fact that it requires a 1/3 longer bolt to go through three sections of tubing rather than two. Not only were the longer bolts not included, they were not even accounted for in the laughable page of instructions. I wouldn't be surprised if they had never even put one of these together or it would have been so obvious that there are major issues with the kit. While conceivably the mis-drilled holes could have been a defect only specific to my order, it seems that the lack of washers or required longer bolt is standard across production as the instructions do not specify these as components in the package.
The longest supplied bolt was still too short to join 3 tubes at the door frame
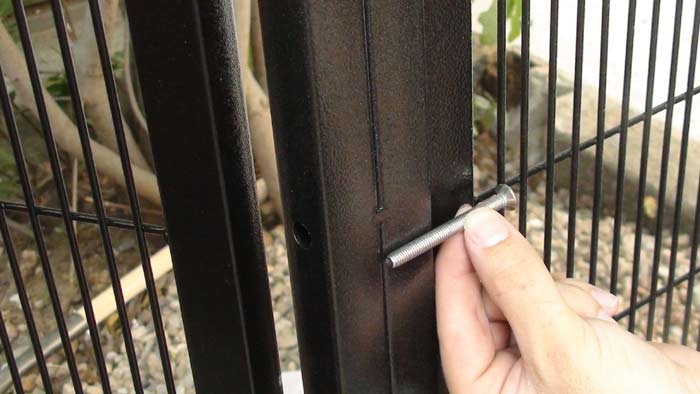
So yet again I had to make a trip to the hardware store and I was lucky to just make it before closing time. I requested a bolt of the same metric thread but 1/3 longer in length. Unfortunately metric bolts are difficult to come by around here and limited in selection. So the proper bolt was unavailable. We decided to go with an imperial bolt of similar diameter instead. Since the holes were over drilled, the imperial bolts fit through and I was able to lock them in with a nut. The trouble was that imperial bolts of that length were only available with a protruding hex head. This head extended into the gap between the frame and door and was making it difficult to shut the door. By over tightening the bolt and allowing it to bend the tubing in a little bit, the problem was solved. The panels were secure and the door could open and close freely.
When we bought the long imperial bolts, we bought extras to account for the second door. However, because of the way the second door panel mounts in reverse, the longer bolts are actually unnecessary. But contrary to the bolt suggested by the instructions (the medium bolt of the set), the longest bolt in the set is necessary to make this attachment. Luckily two longer bolts remained from the other side which were replaced by the even longer imperial bolts so they solved this issue with available hardware. Then we came across another set back. This one had to do with our ground configuration rather than cage assembly.
My brother bolting a corner together with our own ratchet allen key
Ground Troubles
We had assembled all the aviary sides so it was beginning to take shape. While we didn't expect the aviary to stand perfectly on uneven ground, we had a problem because one side was barely touching the ground entirely. One of the trees in the yard had a shallow root that was forcing the cage to stand out of balance. This would either require elevating all other sides or breaking the root a bit. Since the goal was to bury the aviary in the first place, raising it was the least preferred option. So we looked for ways to break a notch into the root to get the aviary to stand a little lower and more even. Digging, chiseling, and sawing proved ineffective. The tedious solution that ended up proving helpful was to drill a plethora of wide holes in a series using a spade bit. The tree has many roots and I'm sure this one will heal itself around the cuts anyway. The root was very hard and the process took a long time. Finally we had a 2" wide by 10" across groove to drop the aviary side into and thereby bring the entire aviary closer to level and supported. The drilling had taken longer than expected and we were completing it in darkness.
Let's Not Be Too Optimistic
The following day we continued the project, starting out with mounting the top panels. I was excited that at first these did not seem defective as the first few holes that I tested lined right up. No sooner was I excited that finally something was not screwed up than it turned out that other holes in the same panel were in the wrong places. I had to unbolt the panel and take it down to drill holes. The defects were not symmetrical which made this all the more confusing. I had to verify each hole individual prior to redrilling them. The other top panel had the same problems. Once again this ended up turning into an all day affair because of new problems left to tackle.
Major Parts Missing
After mounting the top cage bars, we were ready to proceed to configuring the roof. I had previously seen that all the roof panels were packaged together and gave it little thought. Since there are so many components and much complexity, I was trying to work on the aviary in a linear fashion and tackle problems as they come. If I had known there would be so many problems, certainly I would have preferred to check everything up front but from a practical stand point that would have been very difficult because of limited space. So as we unpackaged the roof panels, we discovered that the roof risers, supports, and caps were entirely missing. I tried to call the manufacturer about this but it was already late in the day and they had closed. So the only thing to do at this point was to put this off and continue working on the bottom.
Preparing the Aviary Bottom
We unrolled the wire mesh I bought to line the bottom. Although it is galvanized, I am not worried about the parrots getting zinc poisoning as the mesh would be buried under several inches of gravel. We briefly lifted the aviary and pushed the mesh underneath. This way the aviary actually stands on top of the edge of the mesh and a few inches protrude outward. It took two pieces to cover the entire width of the cage but the overlap is not a problem at all. To create a bonding strength of a whole mesh underneath the aviary, we zip tied the two pieces of mesh together. Then we zip tied the ends of the mesh around the entire perimeter of the aviary spaced every few inches. We also added a dozen stakes into the mesh at the corners and various points around the aviary. So the aviary is securely tied to the mesh and the mesh is staked down to the ground. If that isn't enough to hold the aviary from tipping over, then the hundred of pounds of gravel we replaced back into the aviary surely will.
An insightful move on my part was to buy 6 bags of additional gravel and a huge bucket that was on sale. I wanted to make the gravel higher inside the aviary than out to help water flow outward and away from the aviary. Also the extra thickness keeping the birds away from the mesh was a good bonus along with the added weight. The bags of gravel made it easier to carry them straight into the aviary. They were a different colored rock than the ones existing in the yard so we buried these deeper so that they would only contribute to depth rather than surface. Then we used the large bucket to carry loads of gravel back into the aviary. This was much easier than carrying it one shovel load at a time. It was easy to rake and shovel the area clear before the aviary but carrying it through the door was solved by the bags and bucket solution.
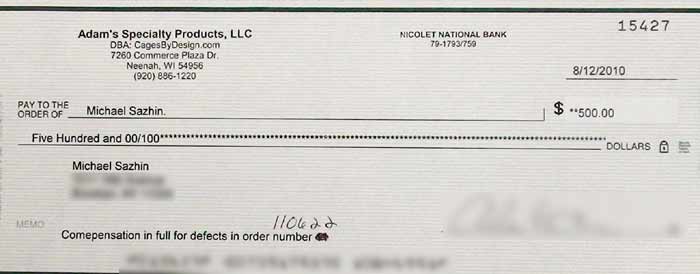
Payback
The following day I got a hold of the manufacturer and explained yet another problem (missing roof hardware and missing feeder hardware). After discussing with the manager and owner, they agreed to overnight all missing hardware to me as well as a $500 refund for defects. The hardware did not arrive the next day but rather the following one. We attached the roof risers and supports and then I prepared to start mounting roof panels. Yet again it turned out that supplied hardware was inadequate. I was 8 bolts short of being able to attach the 8 roof panels (one each). If the bolts were a normal thread, I would have just gotten them at the hardware store but these metric threads are really impossible to source. So there was yet another call to the manufacturer and some more waiting to do. 5 more days passed until I received the required bolts.
$500 refund check: "Compensation in full for defects"
Finally Raising The Roof
Mounting the roof panels was fairly easy but then it took hours to get the caps onto them. The bolts for mounting those are just barely long enough but when you have to bolt in a bolt in the deepest part of the cage from the very top strictly by feel, a bit of extra length would have made it all the more possible. The roof is very thin and flimsy so standing on it is out of the question. I had to stand on the top most step of the ladder and hang over the aviary to try to get the bolts nearest the center into the blind hole. This was extremely difficult and probably one of the most dangerous parts of assembling the aviary. It also requires pressing down hard on the roof panels to get them low enough to get the barely reaching bolt in and then a lot of pressure is required on the wrench to get the bolt to thread inward. A longer bolt would have been a very relieving solution, but hey I don't think they have ever put one of these together on location so what would they know?
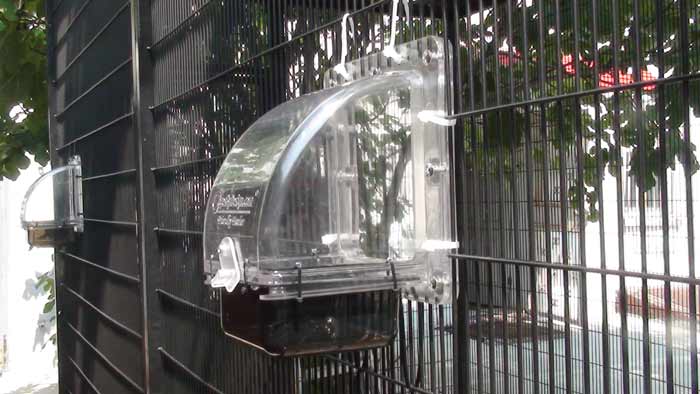
Not So Friendly Feeders
Next we made some alterations to the so called "friendly feeders" to make them a bit less friendly and instead more secure. Basically we used a drill press to put a lot of holes into it to zip tie things permanently shut. Originally I wanted to rivet the feeders into the aviary but I was worried about shattering the plastic. So instead we drilled holes and used a ton of zip ties in addition to the bolts that were sent to me in one of the follow up packages. As for the food bowl, I was absolutely not going to chance losing my birds to the security of a little flap on a flimsy screw holding the bowl from falling out. Considering my escape artist parrot had managed to get out of her cage when it wasn't double latched, I'm not going to take a remote chance of that outside. Once again it is also a theft concern as well because someone could remove the food bowl and reach an arm in through the feeder.
We added many zip ties to make the friendly feeders more secure
Since I was prepared to cancel the feeders all together, I was not concerned about the loss of convenience by locking the food bowls in permanently. We just added holes on all sides of the food bowls and zip tied them into the feeders. Not only does this prevent them from being able to slide, but it also eliminated the undesirable gap between the food bowl and the feeder. I do realize that my parrots could chew through the zip ties but I figure that quantity is on my side. I am likely to be able to catch that some are getting broken and replace them or come up with tougher solutions if it really becomes a problem. Recently I found a stainless steel equivalent to zip ties so I'm holding onto those in case I need such an upgrade. As for intrusion, I believe the same ideas apply. All of the reinforcements that I added increase the difficulty of a break in and thus make it less lucrative than a snatch and run. I seriously don't think that even with proper tools that it would be possible to break into that in cage in anything less than 10 minutes. Considering how much effort it took to build that aviary, I am certain it would take no less to take it apart. Cutting wire ties, unscrewing bolts, cutting the cage bars are all possibilities. However, these are all so numerous that it would require some heavy tooling and a big loud job to make it happen. Everything is protected multiple times. This is the best deterrent that is working on my side. I also plan to hang a security camera from a vantage point facing that way so I could keep an eye on the birds when I am not outside.
Completion
Finally by the 10th day the aviary was complete.
Standing by completed aviary content to finally be finished
Here is an approximate break up of the the time consumed on this project:
-Unloading truck and moving all parts to the site: 30 minutes -Preparing the space for the aviary: 4 hours -Redrilling defective holes: 3.5 hours -Assembling cage and roof: 6 hours -Adding security measures including bottom mesh, stakes, wire ties: 3 hours -Calls/emails to manufacturer about problems: 2 hours -Making additional trips to the hardware store: 1.5 hours -Waiting twice for missing parts to arrive: 8 days
Assembly Video
Cages By Design Product Review
So here is my overall review of the 8'x5' Suncatcher Aviary made by Cages By Design:
Except for the inaccurately helpless instructions, incorrect hole alignments, useless allen key, bolts falling through, unsupplied long bolts, dangerously insecure friendly feeders, missing feeder bolts, missing roof supports, missing roof bolts, poorly thought through assembly, frequently chipped powder coat, often weak or broken welds, inaccurate and poor workmanship, long turn around time, and exorbitantly high price... excellent!
You can see how the cage bars are wavy. It's difficult to show the broken welds.
Just one of many examples of chipped powder coating. Honestly not sure if factory defect or caused in shipping
Basically if you are not a handyman or planning on hiring one, you can forget about ordering this product (or probably any product at all from this company, I can only imagine how these quality control standards carry over to other cages). On the other hand if you are good enough to tackle this kind of project, then you can probably build one of these on your own from scratch in about the same amount of time. The simple truth is that I had absolutely no idea that this would turn out to be such a nightmare. Once I got started, I was just drawn into fixing endless problems with this aviary. For the kind of money they charge for this product (and even taking the $500 refund into consideration), this is an absolute rip off. You would expect a high quality, professionally designed product that assembles easily for this kind of money but instead you get stuck with a tedious repair project.
I am convinced that the difficulties I had assembling this aviary are not an isolated incident but a complete design flaw. Online, I was surprised to read that other people had the exact same problems building this aviary. I also happened to meet some people who own this kind of aviary and they confirmed having much the same problems. For these reasons, I am quite certain that Cages By Design produces flawed products that are insanely overpriced. If they put have as much effort into design and quality control as they do marketing, they would have a more usable product.
Believe me, I was not predetermined to write a bad review. I was very excited to be getting an aviary for my parrots and would have been thrilled with the product if it just went together and my parrots could enjoy it. If there were only a single issue (say just feeder hardware missing), I could forgive that as an honest mistake. But when practically every component of assembly was laden with major flaws and things were missing, it is impossible to feel anything but cheated. Actually I (wrongly) assumed that for that kind of price everything would be perfect and that I would be able to make a video and go on to write a review about how fantastic the aviary is. I was actually hoping to be able to write a good review of the product and then strike up an advertising deal with the company. Their ads have already been flashing on my blog through google, so I wanted to approach them directly. However, now with the knowledge of how flaws their products are, I could not in my right mind ever recommend them to anyone. In fact I will be making sure that even through the automated google ads, that their advertisements never appear on my website. I would feel terrible if someone had to go through what I had been through as the result of seeing their marketing on my website. I would not go so far as calling their operation a scam as they did work with me and send me required parts and a partial refund. However, I can definitely say that they do as poor a job as you can imagine but at premium prices.
Originally, I wanted to be able to promote outdoor aviaries for parrots by demonstrating how easily I build mine and then how much they enjoy it. Unfortunately I did not find this economical or easy at all. Furthermore in my search for a suitable aviary, I did not come across much competition. So I am disappointed that at this time there is not a single commercially built aviary that I can recommend to my readers. Perhaps some day when a quality aviary appears on the market, I will be able to suggest it to you but until that day, I am forced to say that outdoor aviaries will only be limited to parrot owners with extensive building abilities and budgets.
Kili and Truman's First Time in Aviary
Finally I would like to share with you the first time I showed the parrots the aviary. I had discussed with the vet office manager about taking Truman outside and she agreed that sunlight and fresh air would be good for him. Originally I was contemplating putting his entire tub into the aviary but she was suggesting going with a small cage of some sort. This struck an idea with me that I still had Duke's cage sitting around. If only Truman would fit through the door, I'd be able to leave him in the cage inside the aviary. There is no way I would leave him outside strictly in that flimsy wire cage, but inside the greater aviary this was perfectly safe. The purpose of the small cage served more to keep Truman from flying around the aviary or falling down.
Truman easily fit through the door and had plenty of room to spare. Turns out that's a fairly large cage after all. I did not put any perches in because I think it's best for Truman to stay on the flat bottom. Unfortunately, moments after I had put him in he began climbing the cage bars. Most of all I was worried about him falling and injuring his leg again. I put him back down and then added clips to each door on the cage to reduce the likelihood of him getting out. I grabbed Kili firmly and took them both out to the aviary in the backyard.
Kili in my finally completed aviary
Truman inside of a cage in the aviary
I did not want to put Truman's cage on the ground but nor did I want to hang it from the aviary top. So I devised a provisional table with a set of saw horses, two by fours, and a sheet of plywood. I set Truman's cage down on it. He started climbing again but I waited to see what he would do. After a minute of hanging near the cage top he changed his mind and climbed back down. Thereafter he remained on the bottom and found no more need to climb. I left him outside like this for nearly two hours but I took Kili back inside with me. Later that evening was the first time in a week that Truman exhibited at least the slightest interest toward food. I plan to continue having him spend a bit of time outside each pleasant day in this manner until he fully recovers.
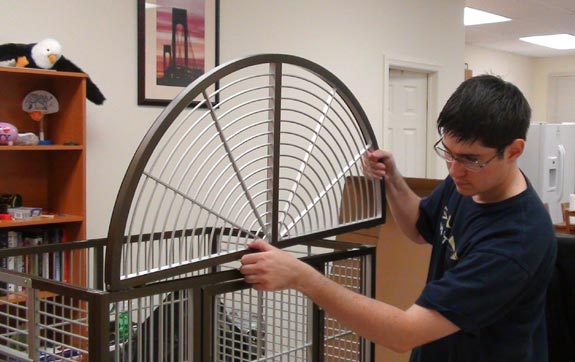
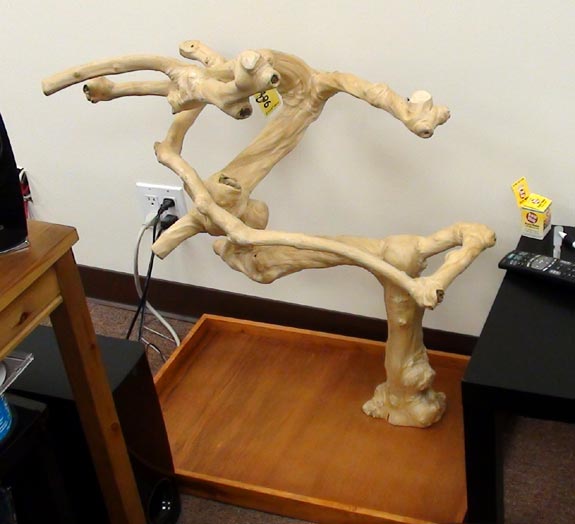
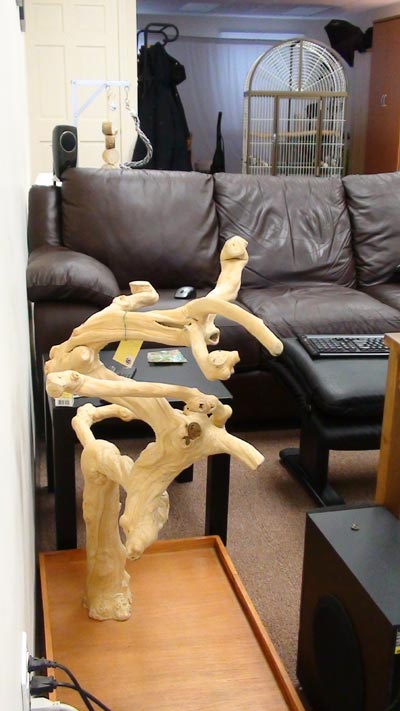
Saturday I went to NJ and bought not only a new cage but all the perches, toys, and supplies for the new Cape Parrot (pretty much everything short of food). Originally I was planning on buying the largest powder coated cage with 3/4" bar spacing. However, someone recommended to me to try Kings Cages (which I had never heard of) so I looked into it and found a similar powder coat cage from them for cheaper. But as I spoke to them on the phone, they recommended that I should go with an aluminum cage instead. Originally, I was expecting to spend $600 for a cage and $400 for a tree. So instead I decided to go with the aluminum cage after all but get a smaller/cheaper tree. It will be much easier to upgrade to a bigger tree than a different cage in the future.
I went to their warehouse to see the cages/trees in person because I had not seen their products in stores before and I had questions about doors and other issues. Maria from Purringparrot warned me that her Cape chewed up the plastic food bowls that came with the cage so I wanted to make sure I could get stainless steel bowls instead. Also I was a bit concerned that the aluminum playtop cage was a bit smaller than the powder coated ones I was previously considering. Unfortunately the cage still comes with the pointless cheap plastic cups but the good news is that for about $50 more, you can get a replacement kit to mount rings in place of the plastic cups to hold stainless steel food bowls. For the kind of price of the cage I think the stainless cups should come standard but at least the upgrade is possible and well worth the money. I was also concerned with the locking mechanisms on the doors because I had problems keeping my Senegal Parrot from getting out of her cage. Luckily the Kings Cages come with a very ingenuitive lock for the front door which requires several motions that would be impossible for the parrot to be able to complete from inside. It needs to be pressed down, twisted, then down again, and twisted a second time completing a 180 degree turn. Also there is a magnet on the front door to keep it closed even if the pin is unlocked. The food doors are also well locked with a pin that is completely inaccessible from inside because of a plate that blocks the parrot from reaching the control.
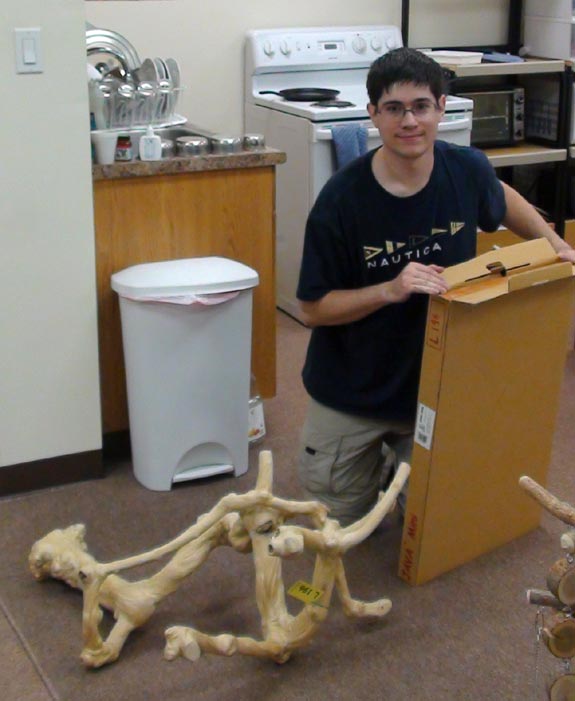
I got to pick out my own tree from the hundreds available. I decided to go with a smaller table top tree not only for cost saving but also to keep the parrot at eye level when I am sitting down. Many of the tabletop trees were too short but the there weren't any short enough tall trees either. Also I didn't like some trees being too covered in branches to prevent climbing space and others being too bare. After much searching though, I found the perfect tree with a lower and higher area that can be climbed. This way I can hang toys from the top and they can be played with on the bottom. I was told that the downside to a short tree is that the parrot can jump off to the floor. At first I didn't understand what the big deal was but he explained that people buy a tall tree so the bird would stay on it. I replied that to me it wouldn't matter because I'm keeping the parrot flighted and it can fly off whenever it wants anyway. I asked to have the bolt for the food bowl removed because I never feed my birds when out like this and don't want a metal thing sticking out. Once again he suggested leaving it for water but I explained that a flighted parrot can just go back to its cage for water whenever it wants it. :D
I requested a Java dowel in place of the machined wooden dowels that come with the cage so we worked out a deal to get some custom cut for the cage. While I was at it, I picked out some toys and additional perches for the cage. Before I was ready to pay, I was asked if I really need the playtop for the cage because there was also a dometop available. I had not even considered the dome top (and I usually thought the dome was cutting off space that a square top could have been). He explained to me that it would actually provide more room. And since I don't leave my parrot to play on top of the cage anyway, I did not worry about missing the playtop anyway. This worked out perfectly because the dome added some space to compensate my fear of the cage turning out smaller than others I had considered.
The prices were good and I ended up buying everything I need for the new Cape within my originally planned budget. So now I can just sit back and wait for the bird knowing I will be ready for it whenever it is ready to come home to me.
The cage came in two boxes and I had many accessories so it filled practically the entire car.
That's my brother helping me unpack the cage parts.
Assembly was actually incredibly easy.
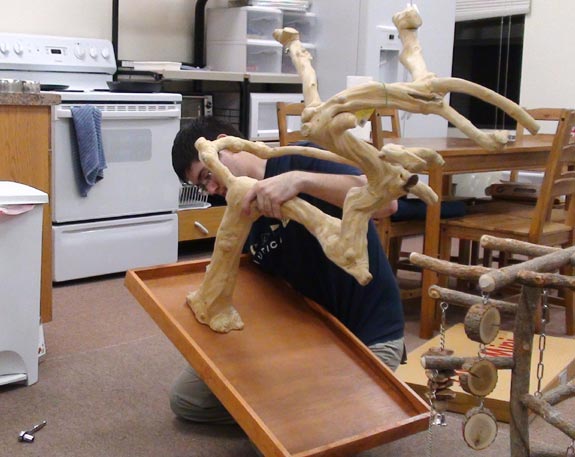
Then I got the tree together.
All it involves is securing one bolt so it's really easy.
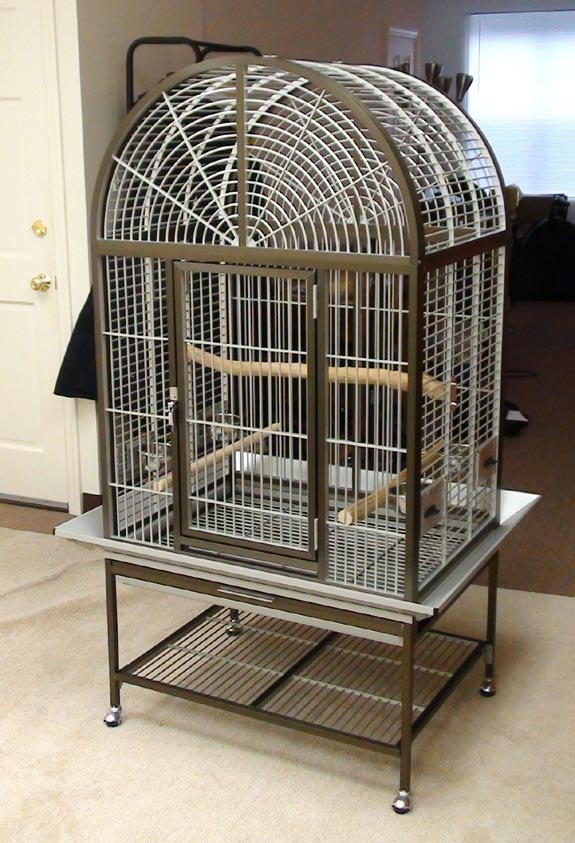
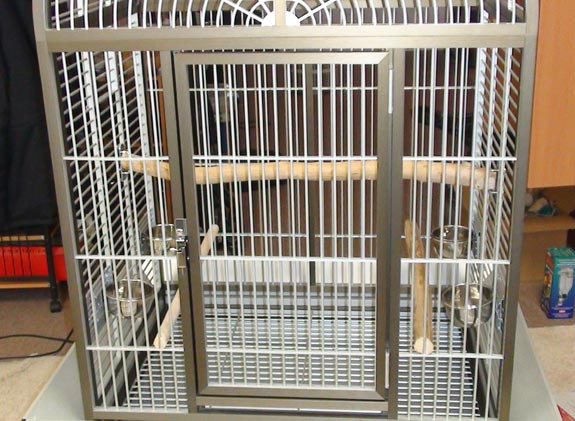
So here's the new dometop aluminum cage for my upcoming Brown Necked "Cape" Parrot.
For 2 out of 3 perches I replaced machine doweled with natural Java but I left one dowel in and saved the 3rd Java for later.
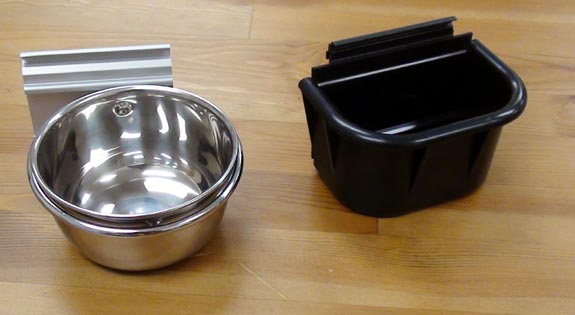
Here is the stainless steel cup and holder to replace the junky plastic cup.
Here are the replaced food bowl rings with stainless steel cups.
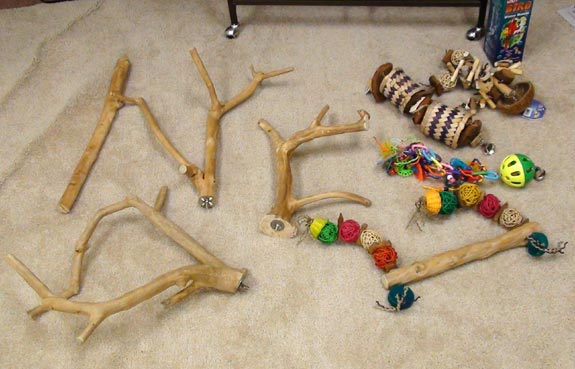
All of the additional perches and toys.
I haven't decided on a place for the tree yet but for now I'm keeping it out of the way so Kili can get used to seeing it but not go on it.
For the next few months, I'm going to be keeping Kili's cage closer to me in the living area so that when the Cape arrives, I could have a reasonable quarantine and so Kili doesn't try to go on the Cape's cage. For now I'm hiding the cage in a corner near Kili's area but not on her spot. I don't want her flying back to where her cage used to be out of habit and land on the Cape cage instead. So I will keep the Cape slightly to the side of where Kili used to be. It's really important that Kili doesn't try to claim the new cage or tree so I want her to get used to not going on them. I left all the toys and things out of the new Cape cage to further reduce any temptation for Kili to check it all out. Overall I'm quite happy with the new set up and now just anxiously await the arrival of my new addition.
Part II, the Review
Yeah, they don't do a good job of making you feel like you bought something worth the money with the cheap included things. The cage should have been $50 more but come with all of the "deluxe" features standard so you wouldn't feel like getting a cheap quality expensive cage. The good news is you can discard (or use as spares) the wooden dowels and plastic food cups and it is really easy to replace these things with natural perches and stainless cups. Many cages you are locked in using whatever they come with and cannot swap, so basically just imagine the cage as $100 more expensive but including what you would expect with it.
I calculated that the cage is 26,000 cubic inches and the dome top adds another 10,000 cubic inches. That's pretty incredible considering Kili's entire cage is just 10,000 cubic inches. That brings the cage up to 37,000 cubic inches which sounds much more fair to me on a proportional comparison between the 2 species. Senegal Parrot: approx 115g, Cape: 400g. That makes the Cape about 3.5x bigger than Senegal and the cage comes out to 3.7x bigger so it's perfect. I was really skeptical about getting the original version (pre-dometop idea) because 26,000 would mean the cape would be more crammed in the new cage than Kili is in hers and I didn't want that. I don't want the large toys and perches to make the bird too crammed but now with the extra dome, it works out just right. I didn't want the playpen much anyway. And to my surprise the dometop cage is actually a bit cheaper than the playtop one even thought the dome looks like more material and labor to make.
It comes with four feeder doors/cups which I think is overkill but I guess nicer for symmetry. I think I would have still produced just 2 feeders but larger cups than 4 small ones as it is. I usually mix everything in a single bowl for the parrot rather than separating things by bowls. Also I use a water bottle so 2 bowls is definitely enough for me. I suppose for parrots that drink from a dish, 3 bowls is better so they went with 4. I don't have to leave all the bowls in so the extra doors and capability don't really hurt.
As I do not have the bird yet, I cannot give you the bird's review but I can tell you what I think of the cage compared to the powder coat cage I have for Kili. There are many things I like but some that I dislike by comparison. I think the steel cage feels sturdier but the aluminum one is lighter and somewhat more manageable (relative to sizes). The aluminum cage is very easy to assemble, it just snaps in place. I don't think the parrot can disassemble it though because gravity, friction, and shear strength hold everything together. I think there is a high premium for the aluminum material so unfortunately the cage suffers from some poorer quality/workmanship that may go into the powder coat ones. Like I mentioned the food cups and perches for a start. Also it just doesn't appear as neatly built. I'm sure once the bird gets to either kind of cage that's all over. But it just doesn't look the quality of the price you pay for it. I think in the long term it still comes out worth it and it will last longer but it just doesn't look finely produced. For the kind of money they charge, I think they should have upped it a little bit more but made a deluxe quality cage out of the concept rather than a very expensive economy kind of cage.
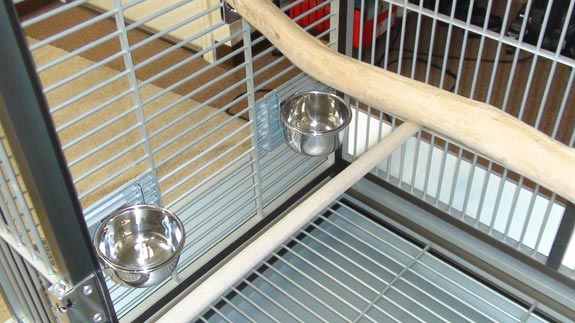
You can see the poor workmanship in how certain pieces don't come perfectly together without a gap or you can see in the picture that the food bowls are crooked and not level. The feeder doors are much lower on this cage than Kili's but the jury is still out whether I like that or not. Actually I think that will probably end up a good thing because Kili rarely uses the bottom of her cage. This way the parrot can use bottom for feeding and top the way it normally would anyway. The down size to low food bowls is that there is a better chance it will poop or drop things into them. Also the food bowls (plastic and metal replacement ones) are smaller than the ones on Kili's cage but the bird is bigger.
There was one thing broken on the cage when I got it but I didn't bother exchanging cause it was an easy fix for me. On the bottom shelf, one of the screws wasn't holding because the hole for the bolt was stripped too wide and the bolt wouldn't tighten. I have my own workshop so I easily found a screw just slightly thicker that I used to secure into the stripped hole but I can imagine this being a big problem for most other people. Basically the biggest failure of the manufacturer in this case I would say is that they are selling an expensive cage but at economy quality and configuration. I don't think people would notice $50/$100 more as a major increase but would appreciate an all inclusive well built cage for the money. It is hard to match the price of the quality to the perceived value because of the expensiveness of the aluminum. It is still a good cage and I recommended but still to this day I have not come across the "perfect parrot cage" that has every feature you'd want, well made, and still reasonably priced.
Here's a list of things I noticed about it already.
Dislike: -A bit wobbly -Poorer workmanship -Plastic cups -Machined dowels -Food bowls smaller than on Kili's smaller cage
Like: -Aluminum (material, no rust, light weight) -Very big door -Latching systems (both main door and food doors) -Extra space afforded by dome option -Color and options of colors -Seed catcher loops into the inside of cage so everything should fall in -Possible to "upgrade" to stainless food bowls -Bottom shelf -Easy assembly -Size and look
Trained Parrot is a blog about how to train tricks to all parrots and parakeets. Read about how I teach tricks to Truman the Brown Necked Cape Parrot including flight recall, shake, wave, nod, turn around, fetch, wings, and play dead. Learn how you can train tricks to your Parrot, Parrotlet, Parakeet, Lovebird, Cockatiel, Conure, African Grey, Amazon, Cockatoo or Macaw. This blog is better than books or DVDs because the information is real, live, and completely free of charge. If you want to know how to teach your parrot tricks then you will enjoy this free parrot training tutorial.
Trained Parrot site content Copyright 2010-2020 Michael Sazhin. Reproduction of text, images, or videos without prior permission prohibited. All rights reserved.


